
Creating Immersive 3D Audio with ADX2 and Unity: Part 3
Introduction
Part 1 of this series covered some of ADX2’s basic 3D audio features. Part 2 expanded on that by exploring source-based and listener-based attenuation. The final part of this series will unpack the process of updating our 3D audio parameters in real-time with code. This will allow us to create sound sources which move and rotate around the world the way the player does. Watch the video below to see this effect in action, and feel free to grab the Atom Craft project from any of the previous blogs to quickly get started.
ADX2
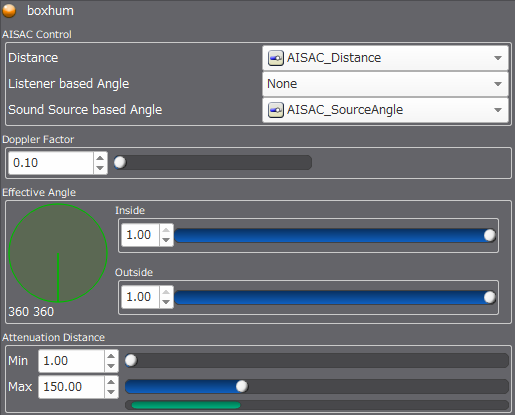
For this to work, all we need to do is set up the Sound Source Based Angle with an AISAC on our Cue, as we did in Part 2. We could use the Effective Angle instead, however, using an AISAC does provide more flexibility in terms of attenuation shape, and it also allows us to apply filtering if we want.
Unity
The code required to update a 3D sound source is straight-forward, but there are a few points to note:
- We need to create a new CriAtomEx3DSource and assign it to our main CriAtomSource via player.set3DSource(CriAtomEx3Dsource).
- Next, we apply any arbitrary rotation and movement to the object and then update the 3D audio parameters using the SetConeOrientation and SetPosition methods, piping in the corresponding object’s forward and transform.position values, respectively.
- Finally, we need to call a specific update method on the 3D sound source, informing it to make the necessary changes.
The Debug.DrawRay function is just to visualise the direction of the sound source, which is handy for objects which don’t have a distinct front face (such as our cube).
using System.Collections;
using System.Collections.Generic;
using UnityEngine;

public class CubeRotation : MonoBehaviour
{
    public float speed = 0.25f;
    CriAtomEx3dSource source3D;
    CriAtomSource atomSource;

    void Start()
    {
        atomSource = GetComponent();
        source3D = new CriAtomEx3dSource();
        atomSource.player.Set3dSource(source3D);

        atomSource.Play();
    }

    void Update()
    {
        Debug.DrawRay(transform.position, transform.forward * 100.0f, Color.red);
        transform.Rotate(0, speed, 0);

        source3D.SetConeOrientation(transform.forward.x, transform.forward.y, transform.forward.z);
        source3D.SetPosition(transform.position.x, transform.position.y, transform.position.z);
        source3D.Update();
    }
}
Conclusion
And that’s all it takes! You might not need to update an object every frame (e.g. if it’s static), so you could just call the necessary cone orientation and position code in the Start() function. Overall, this is just an extension of last month’s blog, and the same use-cases apply. However, the real-time aspect is particularly important if you are trying to create, for example, a more dynamic dialogue system. You could set it so that characters which are facing away from the player appear slightly more muffled (low-passed), like in real life! This could help a scene feel more immersive.