
Creating Immersive 3D Audio with ADX2 and Unity: Part 2
Introduction
In last month’s blog, we looked at setting up an immersive 3D audio scene in Unity. This month, we will expand on that by looking at how to dynamically attenuate audio based on the relative angles between sound sources and listener. This feature will allow us to narrow the focus our sounds to directional beams, rather than omnidirectional fields. We can use this to simulate the effective angle of a speaker, to clean up our mix, or as a game mechanic, informing the player of an important object. Watch the video below to see the results of these features working together within Unity:

1907_SpatialAudioPart2.zip
This project was created using CRI Atom Craft V3.41.01 and Unity V2019.1.6f1
Effective Angle
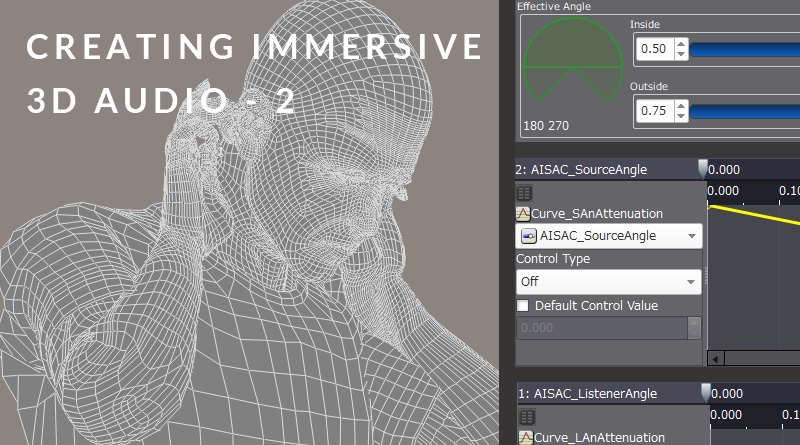
This setting is very simple to set up. First, we need to select the waveform region which we want to affect and navigate to the Pan[3D] menu in the Inspector, wherein we can tweak the Inside and Outside angles. The Inside angle represents the cone within which sound will be played back with 0 attenuation. The Outside angle represents the cone within which sounds will gradually be attenuated between the edge of the Inside and outer part of the Outside angle. When the listener falls within neither of these angles, the sound will be fully attenuated.

To better conceptualize this, be sure to make liberal use of the Session window to audition different settings. If we set the angles as follows, we get the result seen in the video below:

Sound Source Based Angle
At the top of the [3D] menu, we can find several dropdown boxes where we can hook up AISAC Controls. For the Sound Source Based Angle option, this offers a very similar feature to the Effective Angle. However, the former option allows us to customize the shape of our AISAC curve, as well as to use other effects. Since they both work to achieve a similar goal, we can set the Inside and Outside values of the Effective Angle back to “1.0”.
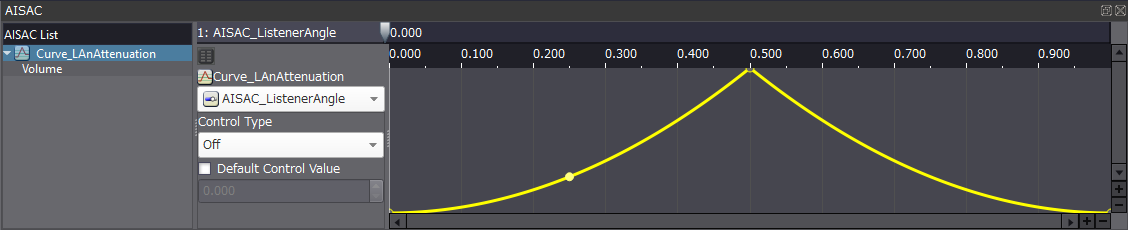
Setting Sound Source Based Angle to an AISAC Control named “AISAC_ListenerAngle” with the following curve, produces the results in the video below.
In this example, the sound source is static, and the listener is moving around it.
Listener Based Angle
We can also derive data from the Listener Based Angle, and as previously stated, we can use a custom AISAC curve to finesse the attenuation. Using this data, we can attenuate the volume of a sound source when the listener is looking away from it. Using this feature in this way can help to create a sense of realism, as the head occludes sounds which are behind it. It can also help to create an auditory focal point for the player.
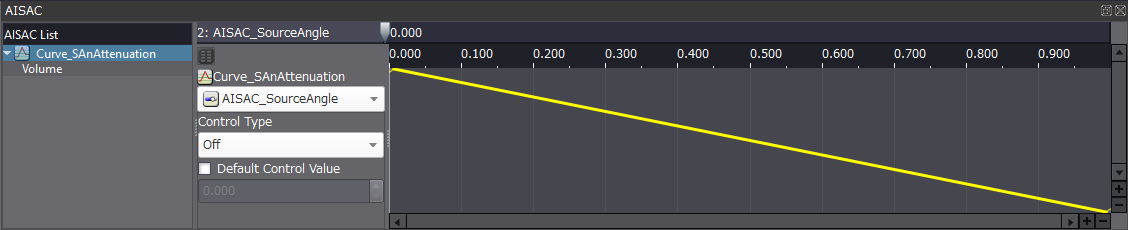
Setting Listener Based Angle to an AISAC Control named “AISAC_SourceAngle” with the following curve, produces the results in the video below.
In this example, both the sound source and the listener are static, but the listener is pivoting on the spot, which has the effect of the source going in and out of the listener’s focus/periphery.
Conclusion
As in last month’s blog, this is all very simple to set up in Unity. So long as the 3D Positioning box is ticked on the relevant Cri Atom Source script, and the player camera has a Cri Atom Listener script, the sound will automatically playback with the dynamic 3D attenuation settings that we set up. Try using other AISAC effects such as bandpass filtering and experiment with different curve types. These features can help to give your 3D worlds that next level of immersion and polish.