
Designing Sci-Fi Weapons
Sci-fi weapon sounds are fun to design as a large variety of source materials and effects can be used. In this post, we will see how to create such a weapon and implement it in Atom Craft.
Preparing the Assets
We will divide the weapon sound in three parts: the charging, the shot itself, and the resulting beam. Several variations will be created for each part to make the sound more interesting and less repetitive once triggered in a game.
Many types of synthesizers can be used to generate laser or beam sounds. Here, we used both the Surge software synthesizer and GameSynth, which provides some really useful generators (like Beam, Chaos or Mega Saw) and allows us to generate great sounding variations in no time.
We did not apply effects to the sounds as it will be done directly in Atom Craft.
Once the variations for each part were ready, we simply dragged and dropped them in the Material Tree in Atom Craft. It is recommended to separate the materials for each part in different folders for a better organization.
Implementation
Now with our Materials ready we can start the implementation of the laser weapon:
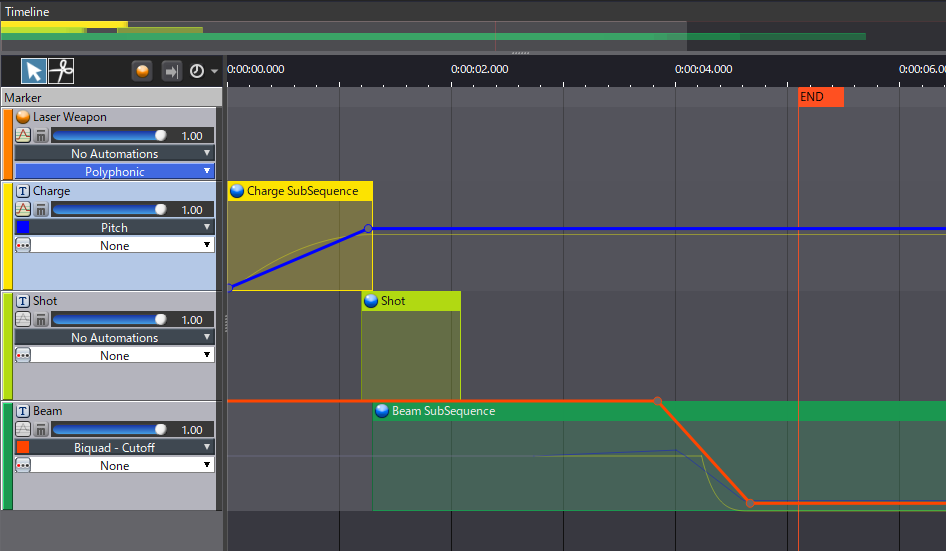
- Create a new Polyphonic Cue.
- In that Cue create 3 Tracks: Charge, Shot and Beam.
- Then, on each track, create a SubSequence of Random no Repeat type.
- From the Materials Tree, drag & drop all the sounds for each part in their respective SubSequences in the WorkUnits Tree; the variations will be spread on different tracks.
Back in main Cue, arrange the SubSequences on the timeline so that they play sequentially: first the charging sound, then the shot, almost immediately followed by the beam.
To add even more variation to the sound, random ranges are assigned to the Pitch of all the SubSequences. Varying the timing is also important to create less repetitive sounds. This is achieved by adding a small random range on the Predelay Time parameter for both the Shot and the Beam SubSequences.

Automation and Aisac
Adding automation on the Charge and Beam tracks will help enhance the start and end of the sound.
First, on the Charge track:
- Add Volume and Pitch track automations.
- Create a fade-in curve for both automations, that will cover the whole Charge SubSequence clip.
- Adjust the Curve Type to your liking.
Adding an Aisac on the Charge track will produce more modulation:
- Select the track and, in the Inspector, change the Biquad Filter Type to Lowpass, and increase the Biquad Q to around 5.
- Create an Aisac on the track with Volume and Biquad – Cutoff
- Set the Aisac’s Control Type to Auto Modulation and One Shot with the Time set to 1300ms.
- In both graphs, draw a curve that looks like an LFO (Low Frequency Oscillator) whose rate is increasing.
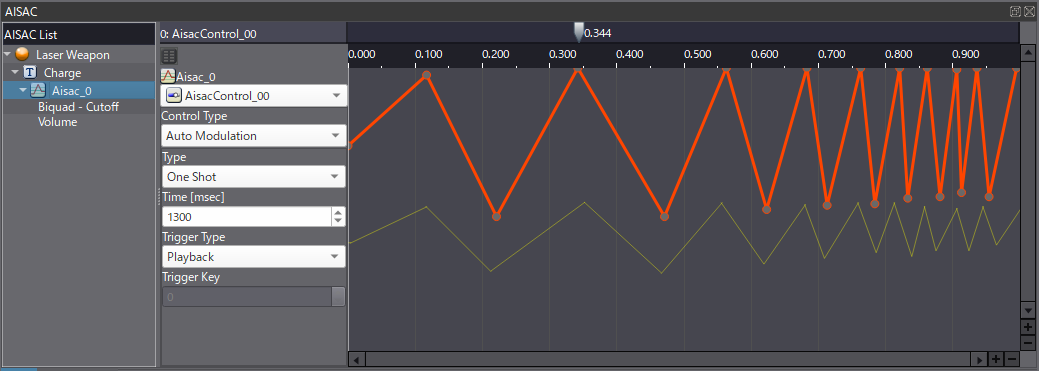
- From now on, when the Cue is triggered, the Aisac will start moving automatically, creating a tremolo effect.
A simple automation is added to the Beam track:
- Select the track and, in the Inspector, change the Biquad Filter Type to Lowpass and increase the Biquad Q to a value between 2 and 3.
- Add Volume, Pitch, and Biquad – Cutoff track automations.
- At the end of the Beam SubSequence, create a 500ms fade-out curve for each automation.
- A slight increase of the pitch before it goes down will emphasize the shutting-down of the beam.
Effects
Finally, adding some effects will glue all the parts together, and create some movement in the sound.
First, our busses must be set up in the Mixer Panel:
- Create 3 new Busses, named Weapon, Wp Delay, and Wp Effects.
- Then, create a Bus Map that includes these 3 busses.
- Route the Wp Delay and Wp Effects busses to the Weapon bus, which will go to the MasterOut.
- Select the Laser Weapon Cue and, in the BusSend section of the Inspector, assign the new Bus Map. Send the Cue to the Weapon bus.
- Select the Charge and Beam tracks and send them through both the Weapon and Wp Effects busses. Lower the send level a bit to avoid clipping.
- Finally, send the Shot track to the Wp Delay bus.
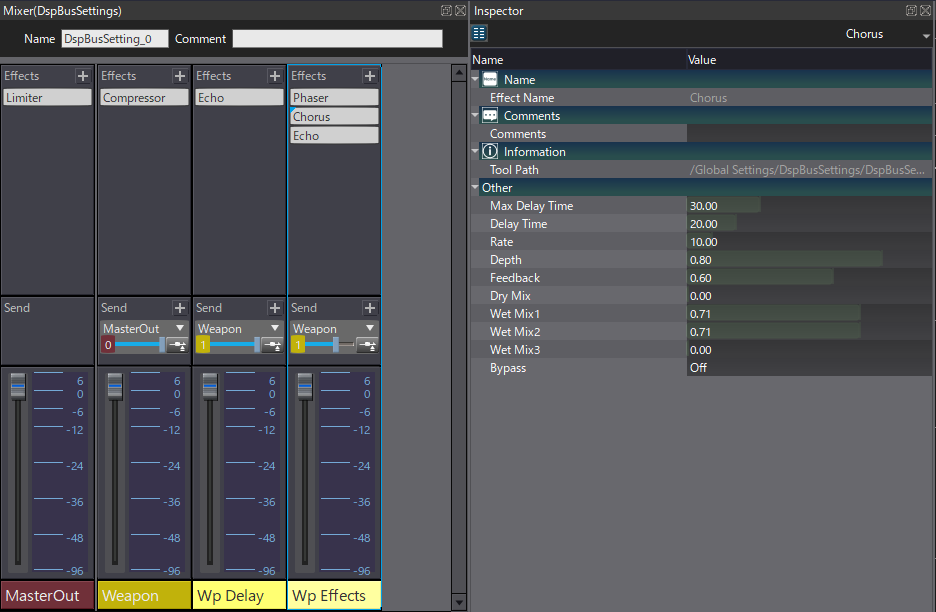
With the routing completed, it is time to add some effects to the different busses.
- Add a Compressor on the Weapon bus to add some punch to the whole sound.
- Add an Echo to the Wp Delay bus. It will only affect the Shot sound, adding a nice release.
- Then, on the Wp Effects bus, add some modulation with a Phaser and a Chorus.
- A short Echo or Reverb can also be added at the end of the chain if a longer release is needed.
Half the fun is in experimenting with various effects. It is possible to change the sound radically simply by playing with the Phaser and Chorus settings. Replacing one of them by a Flanger will lead to different sci-fi sounds, and adding Distortion will allow for the design of more aggressive weapon sounds. Download our demo project below and adjust the various parameters to create the sound you want for your game!
 AtomCraft_Laser_Weapon.zip