
ADX Beginner’s Guide #2 – The Cue System
In the previous part of this guide, we looked at the basics of creating a new AtomCraft project. This time, we will learn about the different types of Cues, which will be the cornerstone of the audio implementation in your game.
What is a Cue?
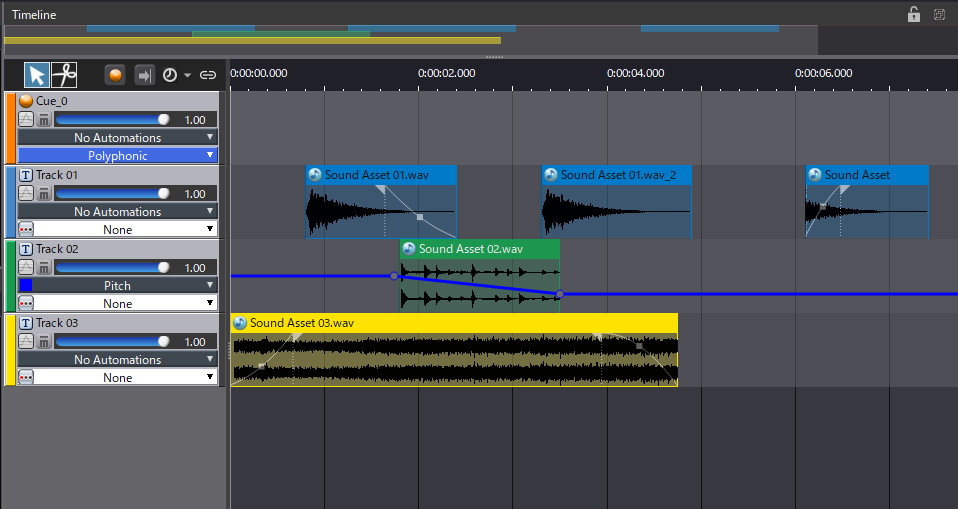
In ADX, a Cue is what will be triggered from the game code to play a sound. It is composed of a sequence with a timeline that includes one or more Tracks (each potentially containing several Waveform Region/Sound Assets). The type of the Cue defines how these Tracks will actually be played when the Cue is triggered. Sound editing operations (move, trim, fade…) can be used on the timeline like in a DAW, and parameters can also be controlled with automation.
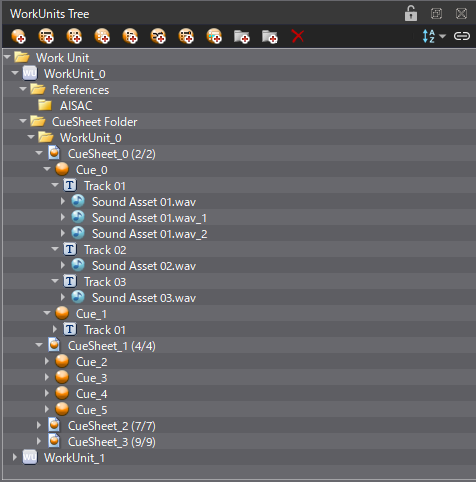
Cues are grouped into Cue Sheets in the Work Units tree. A Cue Sheet is simply a list of Cues and corresponds to a sound bank in other audio middleware. It allows sound designers to organize and export authored audio data as a single file to be loaded into the game. By dividing Cues into multiple Cue Sheets and grouping similar types of sound events together (e.g., environmental sounds for a single level, sounds associated with a specific weapon, UI sounds…), it is easier to manage memory by loading only what is needed, and unloading it when it not required anymore. Making sure that only the sounds and events that are needed are loaded at any given time helps reduce the memory footprint of the game.
Types of Cues
The Sequence Type property of a Cue describes how its Tracks will be played. By changing the type of the Cues, you can easily create complex playback behaviors and tailor sound events to specific in-game situations.
Here are the different Sequence types available:
- Polyphonic (default type): All Tracks are played simultaneously. This is especially useful when creating ambiences or layered sound effects.
- Sequential: Tracks are played back sequentially, according to their position from top to bottom in the Timeline view. Each trigger plays a new Track. Once the last track has been played, the next playback will jump back to the first one. This type of Cue can be used to create the sound of a countdown or implement a music playlist (like a radio program) for instance.
- Random: Each time the Cue is triggered, one of the Tracks is randomly selected and played. The selection process can be weighted by adjusting the Random Weight property of each Track. This is useful for any type of sound that needs variation, such as impacts, gunshots, or foley.
- Random No Repeat: This is similar to a Random Sequence, except that it guarantees that the same track will never be repeated twice in a row. The Random Weight property is also adjustable.
- Shuffle: The order in which the Tracks are played is randomized the first time they are played. After that, the behavior is the same as the Sequential type. A new random order is chosen after all Tracks have been played. This is basically a Random playback that ensures that all Tracks are played once before one is repeated.
- Switch: The Track to be played back is selected depending on the value of a Game Variable or a Selector Label (see the next post of this beginner’s guide). It can be advantageously used for footsteps, by changing the sound triggered based on the material the character is walking in. In such a case, each Track will correspond to a specific material.
- Combo Sequential: The first Track is played. Then the next Track is played only if the Cue is re-triggered within a certain time. If it is triggered too late, it returns to the first Track. As the name implies, this playback behavior is especially useful for combos (as in a fighting or puzzle game).
- Track Transition by Selector: The Track can be switched during playback when a Selector is changed. A crossfade can be set when transitioning between Tracks. It is also possible to transition Tracks in sync with a beat, making it suitable for interactive music.
Creating a Cue
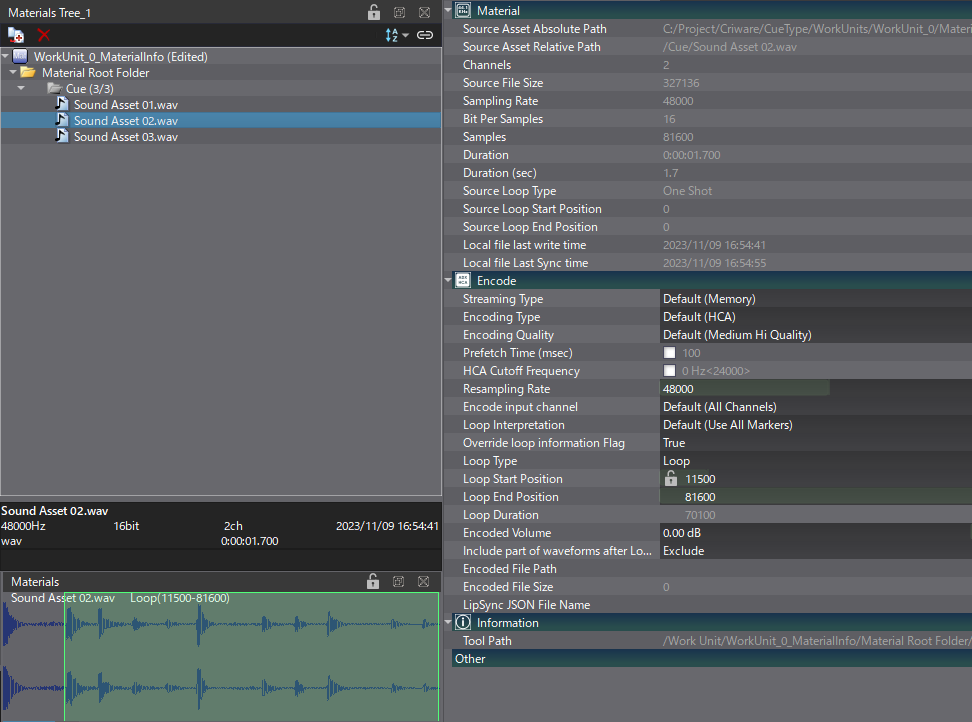
The first step is to import your sound assets – usually raw PCM wave files – in AtomCraft. Each sound asset becomes a Material that can be referenced in the tool. Materials are managed and organized in the Materials Tree, which always displays the materials of the selected Work Unit.
To import assets into your project:
- Select the Work Unit you want to work in.
- In the Materials Tree, right-click on a folder (which can be created beforehand) and select Add Material (Waveform) files.
- Alternatively, you can also drag-drop your files from the File Explorer directly in the Materials Tree.
New Materials will be created. The following properties can be edited for each of them:
- Encoding settings: these are the same settings shown when selecting a platform in the TargetConfig folder (as explained in the previous post of this guide). Changing these settings at the Material’s level overrides the platform’s default configuration. For further optimization, certain types of sounds can use different encoding settings (e.g., longer sounds can be streamed, or the encoding quality of short and noisy sounds can be lowered).
- Loop settings: this is where you can define if an audio asset is looping. Any loop information embedded in the imported wave file will be automatically used but can be overridden if necessary.
Once the Materials are added to your project, you can start adding some Cues. They can be created in different ways:
- Select a Cue Sheet and create a Cue from the toolbar of the WorkUnits tree.
- Or drag and drop one or several Materials on the Cue Sheet. It will create one or more Cues with the corresponding Material already on a Track.
Materials can be dropped on Cue Sheets, Cues, or Tracks in the WorkUnits tree, or directly on a Cue’s timeline. When a Material is added to a Track, it creates what is called a Waveform Region.
Advanced Cue features
Before ending this overview of the Cues, we should highlight two features that make the Cue system such a powerful tool for creating interactive sound events.
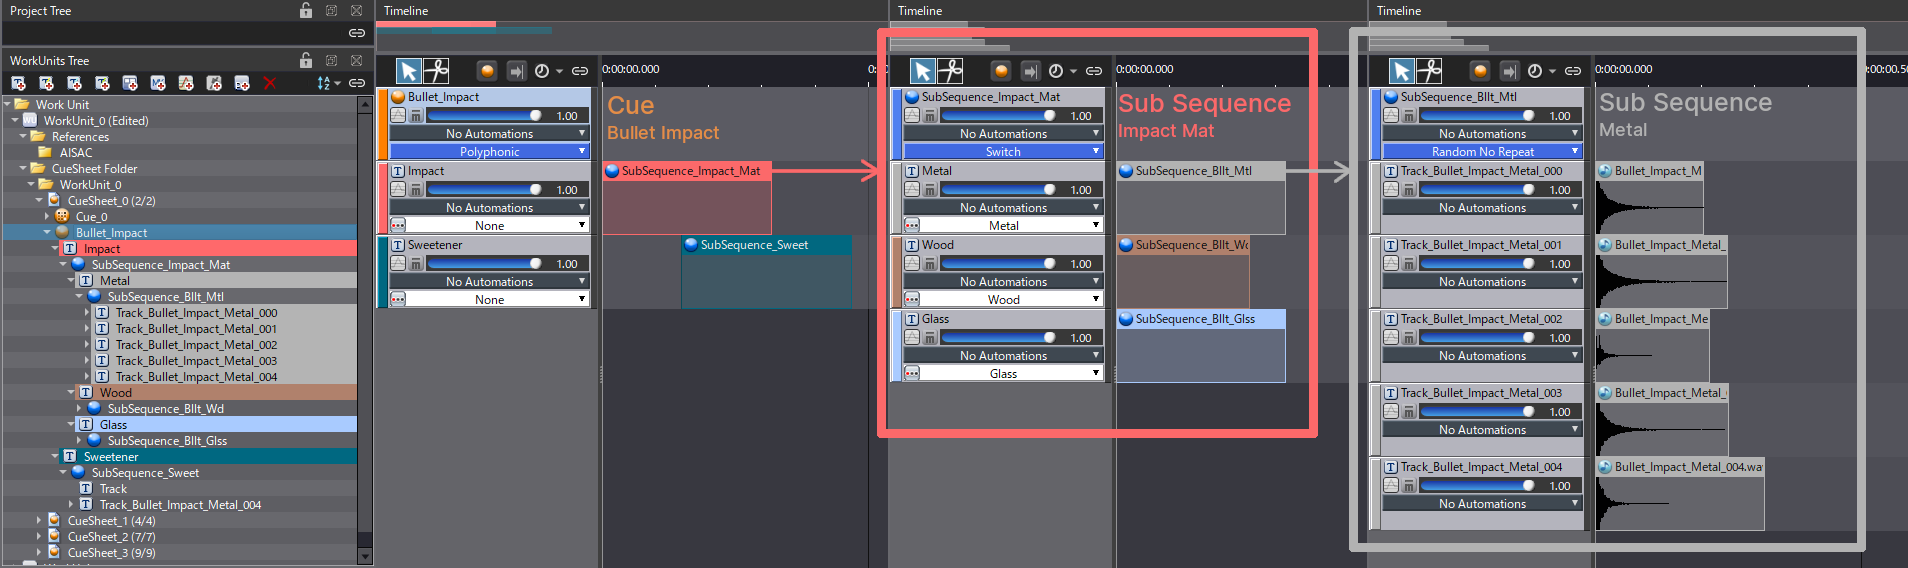
1. Sub Sequences:
- A Sub Sequence is an object that has the same functions as a Cue but can be created under a Track. Basically, it is like a sub-cue and it can be set to any Sequence Type except for Track Transition by Selector.
- Tracks and Waveform Regions can be added to and edited in a Sub Sequence, just like with a Cue.
- When a Sub Sequence is selected in the project tree, its timeline is displayed, as a Cue.
- Sub Sequences can be nested, allowing for complex hierarchies.
2. CueLinks:
- A CueLink is an object that can be added to a Track and refers to another Cue.
- A Cue from another CueSheet can also be used, in which case it is called an External CueLink.

Both CueLinks and Sub Sequences have similar uses, but CueLinks should be used whenever you need to re-use a Cue multiple times and want to avoid duplicating it. Because a CueLink is a reference (link) to a Cue, if the original Cue is edited, the CueLink is also affected. On the other hand, Sub Sequences are more practical if you need another Sequence only in one Cue. Note: when using CueLinks, make sure to avoid creating cycles where two Cues reference each other with CueLinks!
This concludes our introduction to the Cues. You should now be able to implement some simple sound events in your game. In the next post, we will see how to use Selectors and Game Variables to control Cues of Switch type.