
Basic Animation with SpriteStudio
In the previous post of our series about SpriteStudio, we learned how to prepare the assets in a graphic tool, import them in SpriteStudio, and setup the animation. (If you are using Photoshop, you can also check our post about PSDtoSS6, a handy little tool that will do most of that work for you!)
Now that the body of our little witch is all setup, it is time to learn basic animation techniques in SpriteStudio. Let’s create a simple running animation by using keyframes and changing the cells attributes on the timeline. Once we are done, it should look something like this:

Keyframes & Attributes
In SpriteStudio, an animation is created by controlling the attributes of the cells (position, size etc.) over time. To do this, we define specific points on the timeline – called keyframes – at which we want to change the attributes.
For example, let’s select one of the cells we placed on the animation timeline last time. The attributes for that cell are displayed in the ‘Attribute’ pane on the right side of the screen.
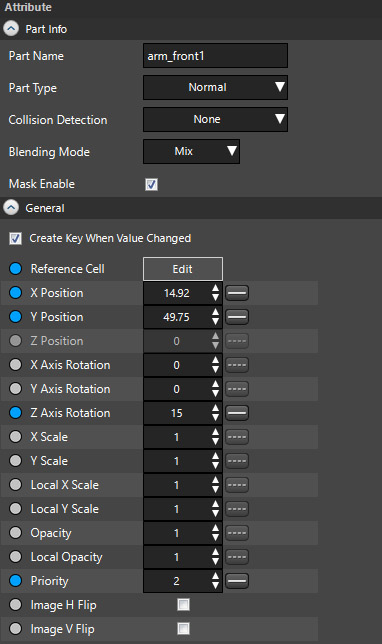
You can see that many cell attributes can be adjusted at a keyframe, such as its Blending Mode, Position, Rotation, Scale, Opacity and Priority (this latest attribute correspond to the Z-order, i.e., whether a cell is on top or under other cells).
Now let’s select our keyframes on the timeline and adjust the cell attributes to animate the little witch. In the case of character animation (for humans, and certain types of monsters) most parts of the body are connected by a bone and will therefore be animated by controlling the rotation.
Check the video below to see the details.
Curve Editor
As you can see on the video, once you have selected the keyframes and set the attributes, you can drag the cursor on the timeline to see the animation evolve and examine what it looks like at a specific point in time (frame).
You will notice that the attributes don’t jump suddenly from one value to the other. Their values are interpolated between two keyframes. The interpolation curve can be used in the Curve Editor window.
The default interpolation is linear, which means that the attribute values will change at a constant speed. However, there are other options, such as Bezier, Hermite, Acceleration or Deceleration.
In the video below, a Bezier curve is used to smooth the flexion of the second joint of the leg.
Reference Cells
You may have noticed that in our running animation, the eye of the witch blinks. This particular effect cannot be achieved by simply changing the position, rotation or scale of an animated part.
To do this, we used the Reference Cell attribute, a very important attribute that allows you to change the cell referenced by the animated part during the animation.
In the video below, you can see how we switched the cell referenced by the face_eye1 part from an open eye to a closed eye and vice-versa in order to simulate the blinking.
You can now play the full animation from the toolbar located the bottom of the screen. This is also where you can change the number of frames per seconds (FPS) of your animation.

This concludes this month’s introduction to basic animation with SpriteStudio. We have seen how to change the properties of the animated parts at specific keyframes, how to interpolate between these keyframes for a smoother movement, and how to change the graphics in the middle of the animation if needed. This should already allow you to create simple character animations.
SpriteStudio also boasts more advanced features such as “Bone & Mesh” , useful to animate bending objects, “Particles” to create particle effects, and “Mask” to partially cut cells.
We will be exploring the possibilities these features offer in the next installment of this introduction to SpriteStudio, so don’t miss it!