
Ambience Design Part 2
Introduction
In this series, we will be looking at designing powerful and efficient systems for ambient playback. In our last installment, we created a monolithic Cue packed with playback logic. With only a single call event in our game engine, we achieved easy playback with a fair amount of randomization.
In this blog, we will create spatialized sounds that will tangibly exist in the game world. By activating 3D processing and using AISAC to dynamically control DSP effects based on the distance between the source and listener, we can dramatically increase the quality and immersion of our 3D environments.
 2020-12_AmbienceP2.zip
This project was created using CRI Atom Craft Ver.3.44.13
3D Audio
In our last blog, we created a vague background ambience designed without the intention of synchronizing it to in-game visuals. This approach is great for sounds that envelop the player, like rain or birds hidden amongst the trees. For objects which the player can interact with and move around, we will need to use ADX2’s 3D Positioning feature.
Applying 3D playback to a Cue is as easy as switching a toggle option. In the Inspector, scroll down to Pan Type and set it to 3D Positioning. We can then enhance and tweak this 3D effect by using attenuation curves based on distance. This will make sources quieter and more muffled the further away they are. To do this, we can:
- Rename AisacControl_00 to “Distance3D”
- Create a new Global AISAC and name it “Distance3D”
- Create a Volume Graph
- Create a Bandpass – Cutoff High
- Set AISAC Control to Distance3D for both
- Create curves roughly as below
- Drag this Global AISAC onto any Cues intended for 3D playback

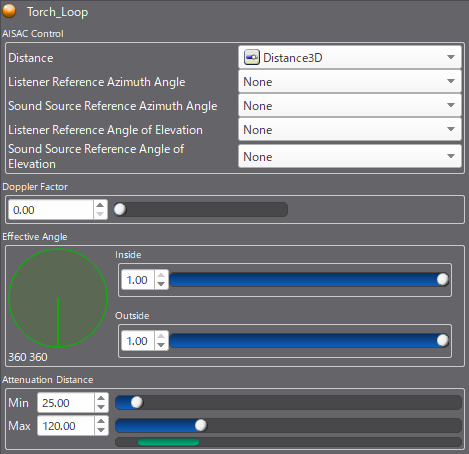
To activate this distance-based effect, let’s navigate to the 3D Positioning tab of our Cue in the Inspector. We can find a dropdown titled Distance, where we can select our Distance3D Control AISAC. We can also set the Max Attenuation Distance to determine how far away the object should be before becoming silent.
Reverb
An essential part of an ambient soundscape design is reverb. Reverb ties all of diegetic sound together and enhances emersion by placing the ambience in context. To help us facilitate this, ADX2 offers highly customizable built-in reverb effects.
One of our first considerations is to think about how reverb should change between levels. If the player transitions from a diffuse forest to a reflective cave, the reverb will need to adapt and update to reflect this change. We can set up a simple implementation of this in Atom Craft using Snapshots. First, let’s:
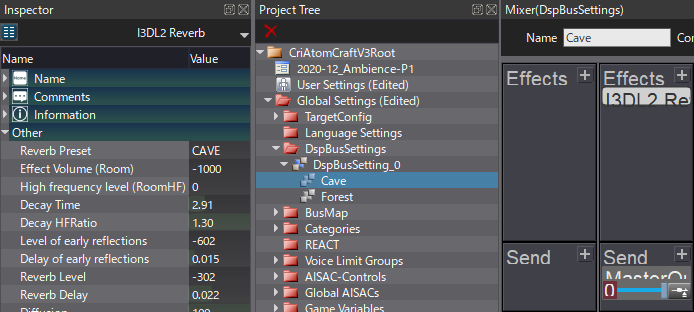
- Navigate to DspBusSetting_0, create a new DSP Bus, and name it “Reverb”
- Add new I3DL2 Reverb effect to this Bus
- Right-click DspBusSetting_0 and create 2 new Snapshots
- Name them “Cave”, and “Forest”
- Set the Reverb Preset to CAVE and FOREST respectively
- Navigate to BusMap for AISAC and Automation and set “Reverb” as DspBusName2
Finally, we can clean up our mix and add some dynamic nuance using AISAC to control the signal being sent to the Reverb Bus based on distance. The result will mean that a sound source closer to the player will have less reverb, making it feel more intimate and nearby. Conversely, as the source gets further away, it will feel more expansive and ambient. To create our system, let’s navigate back to our Distance3D Global AISAC and:
- Create a new BusSend2 (Reverb) Graph
- Set AISAC Control to Distance3D
- Create a curve roughly as below

We can then audition our changes using the Session view, simply using the Positioning 3D view to control all of the above AISAC logic, and toggling between our Snapshots to test the different environments.