
Time Dilation in UE4 using CRIWARE – Atom Craft: Part 1
Introduction
The ability to change the flow of time is a popular mechanic in games. Being able to slow down time gives the player time to analyze and react to a given situation. This effect is often emphasized by making changes to the audio, usually by way of adjusting the pitch. Sometimes sounds are even swapped out entirely if simple pitch shifting does not produce desirable results.
In this month’s two-part blog, we will investigate some straight-forward approaches for creating audio systems that adapt to a “time dilation effect”. In this first part, we will create the framework for our audio system in Atom Craft. In the second part, we will continue with implementation and fine-tuning in an FPS-style game in UE4.
 2020_07_TimeDilation (audio files only).zip
Created with CRI Atom Craft V3.43.09
Sound Design
For our system, we are going to need the following audio (you can find these attached above):
- Footsteps
- Ambience
- Regular
- Time-slowed
- Time Control SFX
- Slow-down
- Speed-up
- Gunshot
- Regular
- Time-slowed
It is worth spending time listening to the effect that down-pitching in Atom Craft will have on various sounds, to determine whether it is necessary to re-design anything. Certain sounds with sharp transients (such as gunshots), often lose impact when they are stretched out, so it can be worth re-designing these in a DAW.
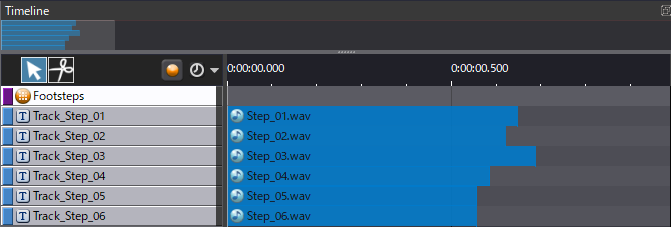
Footsteps
Our footsteps will be pitched down in UE4, so they don’t need any special treatment. To get them up, we can:
- Create a Random No Repeat Cue
- Name it “Footsteps”
- Load appropriate footstep Materials into the Cue
Time Control SFX
Our slow-down and speed-up SFX are also going to use simple playback. Let’s:
- Create two Random No Repeat Cues
- Name them “Time_SlowDown” and “Time_SpeedUp”
- Load appropriate Materials onto each Cue
Ambience
To switch between our two states, we will mostly be using AISAC curves over transition periods. Let’s rename AisacControl_00 to “TimeDilation” and use this for all of our AISACs. Since we only have a single audio loop for each ambience state, we can:
- Create Polyphonic Cue
- Name it “Ambience”
- Load appropriate Ambiences onto separate Tracks
- Create an AISAC for each Track with the following
- AISAC Name – “naturalamb” and “timeslowamb” as relevant
- AISAC Control – TimeDilation
- AISAC Graph Type – Volume
- Create linear curves for each, laid out as below (ensuring the natural ambience has a Destination Value of 1 when AISAC Value is 0)
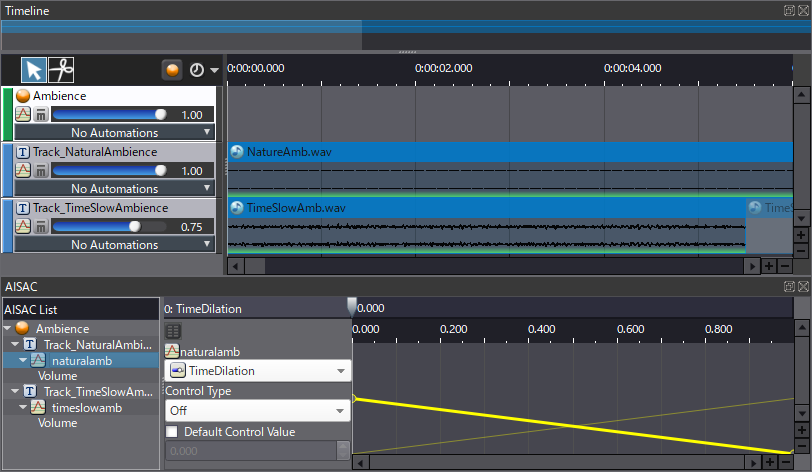
The above will offer us an easy method for fading between ambience states. A Track Transition by Selector Cue would also work well for this but would require a little extra work on the implementation side.
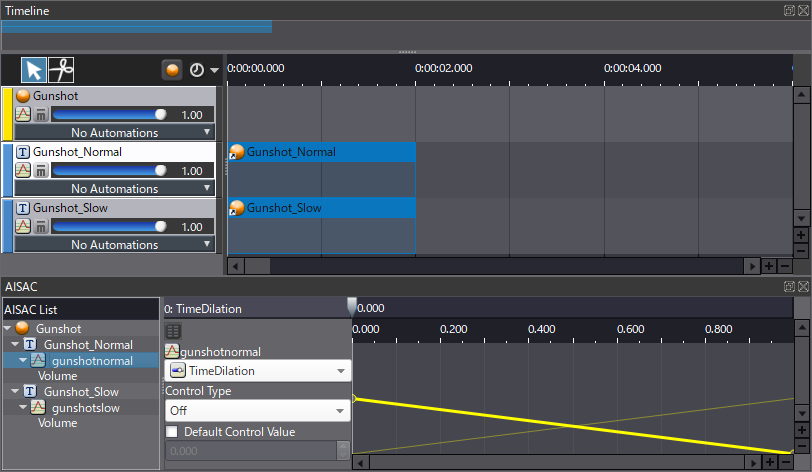
Gunshots
Our gunshots setup will be much the same as for our ambience, but first we need to:
- Create two Random No Repeat Cues
- Name them “Gunshot_Normal” and “Gunshot_Slow”
- Load appropriate Materials onto each Cue
Then we continue with setting up our main Cue which will be used for playback:
- Create Polyphonic Cue
- Name it “Gunshot”
- Link Gunshot_Normal and Gunshot_Slow Cues onto separate Tracks in Gunshot Cue
- Create an AISAC for each Track with the following
- AISAC Name – “gunshotnormal” and “gunshotslow” as relevant
- AISAC Control – TimeDilation
- AISAC Graph Type – Volume
- Create linear curves for each, laid out as below (ensuring the Gunshot_Normal linked Cue has a Destination Value of 1 when AISAC Value is 0)
This whole system can be further tweaked and modified to taste. AISAC curves could control some DSP effects, curve shapes could be finessed and shapes to sound more natural, and pitch shifting could be used in combination in addition to crossfading audio layers. But for now, these settings should give us a solid starting point to work from.
Finally, we can build our CueSheet Binary, ready for importing into our UE4 project in Part 2.