Ambience Design in Atom Craft – Part 1
Introduction
Ambience often doesn’t stand in the limelight like music or player-driven SFX. However, much like music, ambience is essential for setting the game’s tone and fleshing out the soundscape. These sounds can be the subtle din of a room tone or the melodic chirruping of birds. Regardless of the form these sounds take, we can use a few Atom Craft tricks to play them back in exciting ways.
In this blog, we will create a sophisticated ambience system that can be played in-engine with a single event (i.e., all the logic will be built-in). This content will form part of a larger series on making the most of ADX2 for ambience design.
 2020-12_AmbienceP1.zip
This project was created using CRI Atom Craft Ver.3.44.13
Loops
When designing ambiences, a balance needs to be struck between localized sources and general background ambience. Having one big stereo ambience will save on voices, but the file will need to have a long duration to avoid noticeable repetition, and it won’t effectively support discrete 3D spatialization. Using several smaller files will require more voices, but this will support dynamic playback and tighter sync with visuals.
However, although longer files are less flexible than a more granular approach, we can still use some tricks to add randomization. A simple approach is to cut longer ambiences down and crossfade between them, playing back the chunks in random order. We can add fades in Atom Craft, but we can also bake them in using our DAW. If they are baked-in, all we need to do is:
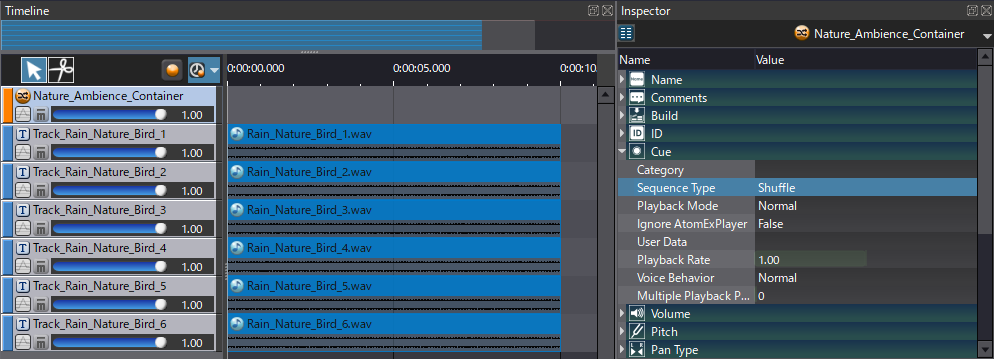
- Create a Shuffle Cue named “Nature_Ambience_Container”
- Drag in all the stereo ambience Waveform Materials
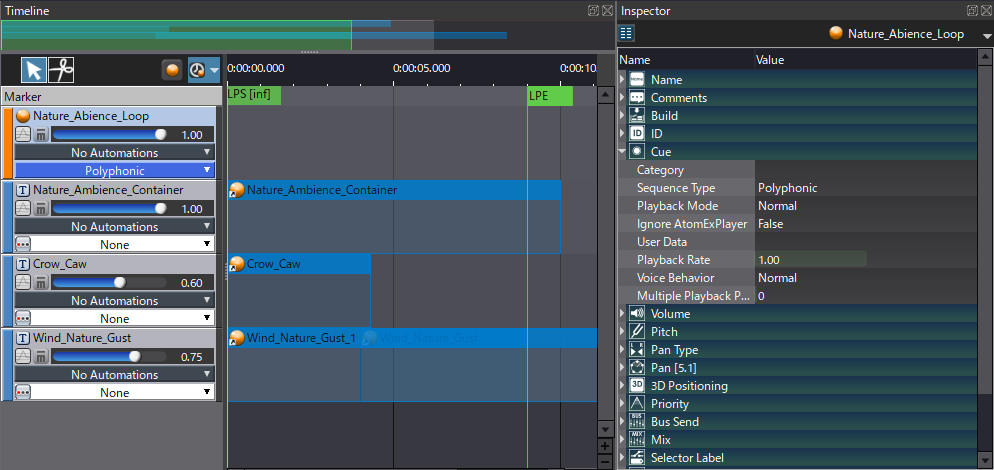
- Create a Polyphonic Cue named “Nature_Ambience_Loop”
- Drag in Nature_Ambience_Container Cue to Link them
- Create a new Sequence Loop Marker
- Set Marker Start Time = 0 [msec]
- Set Market End Time = 9000 [msec]
Sequence Loops don’t stop Track playback early, but they will trigger subsequent Cues early. Since our fades are baked in, this behavior gives the effect of a seamless transition.
One-shots – Simple
Random Containers can be used for more than just random playback. Since this feature allows for setting the Random Weight for playback probability, we can use a one-shot sound with this setting to determine if anything should play at all! If the combined percentage is less than 100, playback won’t always trigger. This approach is perfect for play-and-forget ambiences, where we don’t want additional work on the engine side.
Let’s add a cawing crow that plays back automatically. For this, we need to:
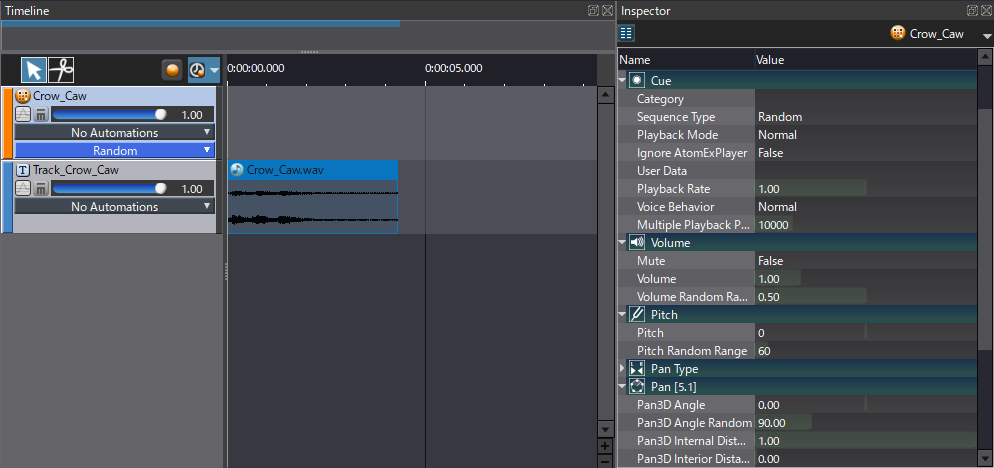
- Create a Random Cue named “Crow_Caw”
- Drag in the relevant Waveform Material
- In the Inspector
- Set Random Weight = 50 [percent]
- Set Pitch Random Range = 60 [cents]
- Set Pan 3D Angle Random = 90 [degrees]
- Set Multiple Playback Prohibition Time = 10000 [msec]
- Drag onto Nature_Ambience_Loop to Link them
- For this Cue Link, set Playback Timing Random = 5000 [msec]
With only one waveform file, we have created a decent amount of randomization. Weight and prohibition time will ensure the sound doesn’t play too often, especially since our main loop is only 9 seconds long. Adding a Random Timing offset ensures that it doesn’t trigger on exact multiples of 9 seconds (when it does playback eventually). And pitch and pan will add some variation.
One-shots – Advanced
To get even more variety out of a small sample pool, we can use Automation. This technique works especially well for ambiences like wind and waves, which have an ebb and flow. To design this, we can:
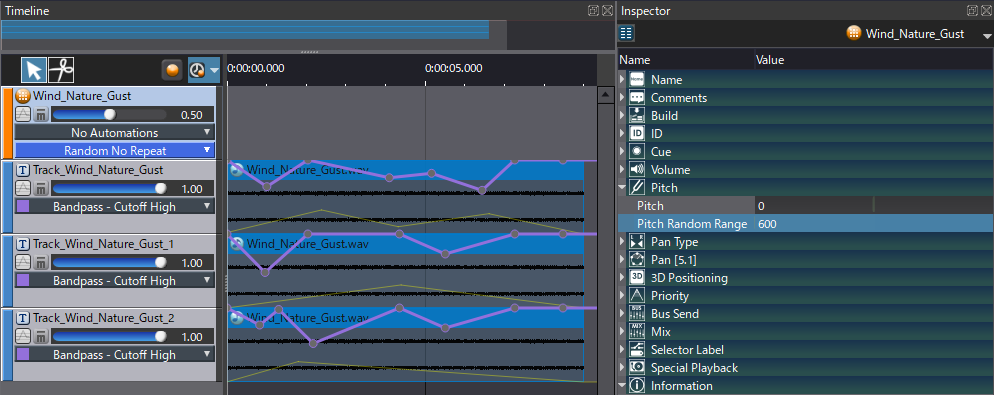
- Create a Random No Repeat Cue named “Wind_Nature_Gust”
- Drag in the relevant Waveform Material
- Duplicate the newly created Track twice
- On each Track, click No Automations and
- Add → Volume
- Add → Bandpass Filter → Bandpass – Cutoff High
- Create some custom curves, ensuring the same start and end values
- In the Inspector
- Set Pitch Random Weight = 600 [cents]
- Drag onto Nature_Ambience_Loop to Link them
- For this Cue Link, set Playback Timing Random = 1500 [msec]
We now have a few different variations, each with custom curves built-in. Since designing these curves is a manual process, we can ensure that they sound natural. And it also avoids having to create some custom logic on the engine-side. If we duplicate our Cue Link and apply offset randomization, we can create an even more natural effect, as the fade-out of one Cue will be masked by the other.