

Creating Dynamic Scrape Sounds in Unity using ADX2
Introduction
In last month’s blog, we looked at enhancing player immersion by creating a system which better reflected physically informed impact sounds. This month, we are going to extend on that by creating a system which reflects physical scraping as well. Together, these two systems should give us a holistic system for most of the rigid physical interactions that might take place in a game.

This project was created using CRIWARE SDK for Unity V2.99.00 and Unity V2019.2.10f1
Atom Craft
The setup for our scrape system will be much the same as for the dynamic impacts. The goal is to create a system which gets louder and more exciting, the faster the ball character moves. To achieve this, we need to set up several AISACs for adjusting volume intensity of our different layers, as well as for controlling effects and modulations.
Since scrapes are continuous, we can make use of looped audio. Again, 3 dynamic levels tend to be enough for meaningful variation, so we can simply:
- Create a Polyphonic Cue named “Cue_Scrape”
- Drag in each dynamic layer Material (which will automatically create our Tracks)

Next up, we can create another AISAC-Control called “AISAC_ScrapeIntensity”, which will be used to send control signal to all our related AISACs. We can then set up volume curves on each Track as we did for each Cue Link in last month’s blog.
Effects
Since the dynamic layers might sound a little disconnected, we can employ some additional effects to blend and generally sweeten them. Here are a few ways that we can take advantage of the flexibility of AISACs:
Any sort of “loudening” effects can be used on an FX bus, and send levels controlled via an AISAC. This helps to add loudness over-and-above the original samples, which might not be too different in terms of raw amplitude. We can:
- Create DSP Bus in our DspBusSetting named “FXBUS”
- Add Distortion and Limiter Effects
- Adjust values in the Inspector to preference
- On Cue_Scrape, create a new AISAC
- AISAC Name – “fx-send”
- AISAC Control – AISAC_ImpactIntensity
- AISAC Graph Type – BusSend1 (FXBUS)
Low-cutoff can be used to imply quietness. This help to make intensity scaling sound a bit more natural than only turning the gain down.
- On Cue_Scrape, create a new AISAC
- AISAC Name – “low-cutoff”
- AISAC Control – AISAC_ImpactIntensity
- AISAC Graph Type – Bandpass Cutoff Low
Finally, some subtle pitch scaling can be used to change the playback rate as a result of character speed. Since the ball will be rotating a certain amount of times per minute, it makes sense that this should influence pitch/frequency.
- On Cue_Scrape, create a new AISAC
- AISAC Name – “pitch”
- AISAC Control – AISAC_ImpactIntensity
- AISAC Graph Type – Pitch
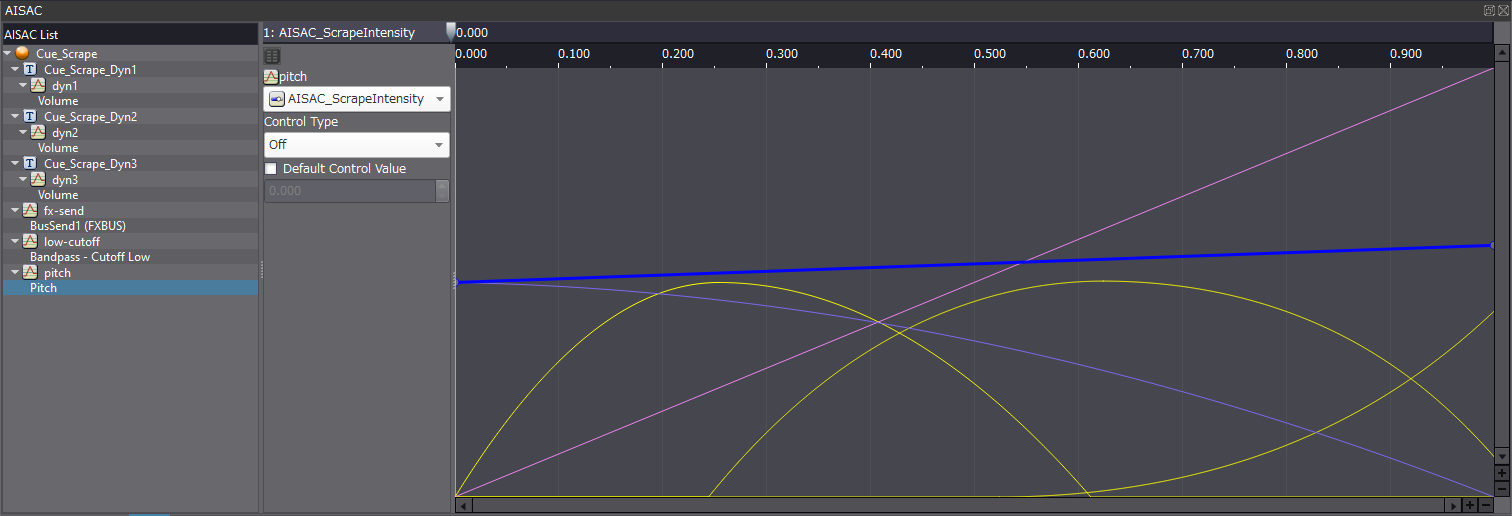
The curves can then be adjusted roughly as above. Each curve is colour-coded based on the Graph Type, to help distinguish each of the parts ( the explanations above have been coloured to correspond with these). These curves are best tested iteratively throughout the design process using the Session View.
Unity
The code needed is much like last month’s, but this time we will use the OnCollisionStay and OnCollisionExit events instead.
using System.Collections;
using System.Collections.Generic;
using UnityEngine;

public class SurfaceScrape : MonoBehaviour
{
    CriAtomSource source;
    bool isPlaying = false;
    Rigidbody sphereRigidBody;

    [SerializeField]
    private float scaledScrapeVelocity;

    void Start()
    {
        source = gameObject.GetComponent();
        sphereRigidBody = gameObject.GetComponent();
    }

    private void OnCollisionStay(Collision collision)
    {
        if (!isPlaying)
        {
            source.Play();
            isPlaying = true;
        }

        scaledScrapeVelocity = Mathf.Clamp((Mathf.Abs(sphereRigidBody.velocity.x) + Mathf.Abs(sphereRigidBody.velocity.z)) / 25, 0f, 1f);
        source.SetAisacControl("AISAC_ScrapeIntensity", scaledScrapeVelocity);
    }

    private void OnCollisionExit(Collision collision)
    {
        if (isPlaying)
        {
            source.Stop();
            isPlaying = false;
        }
    }
}
Since our Collision method is only able to return the impact velocity, we need to refer to the Rigidbody directly to access continuous velocity information. Also, to ensure that the sound isn’t triggered on every frame, we can use an isPlaying Boolean to keep track of the current state.
Our scape velocity is also scaled similarly to our impact velocity. However, since Rigidbody velocity can return negative values, we need to ensure that we get the absolute values. Furthermore, since the ball is only rolling around on a flat plane in this Scene, we can refer to velocity in only the x and z axes for simplicity.
Conclusion
And that concludes our dynamic surface interaction mini-series. This should give you the tools to create some impressive sounding physics-based interactions. This system could be further expanded to make use of Unity’s tag or terrain systems to denote different surface or object types. That way the surface and object interactions are not only responsive but also accurate to their respective materials.