

Charging up Your Weapons in Unity using ADX2
Introduction
Modern games use all sorts of weapon types to offer up a fun and engaging gameplay. From single shot weapons that fire once per trigger, to continuously firing weapons like flamethrowers. Another popular firing mechanic is the charged shot. For this, the player must hold the trigger for an amount of time, after which, a charged-up shot will fire. This usually does more damage and might even come with some added visual flair. This quick blog will walk through setting this up.

This project was created using CRIWARE SDK for Unity V2.99.00 and Unity V2019.2.10f1
Atom Craft
We need:
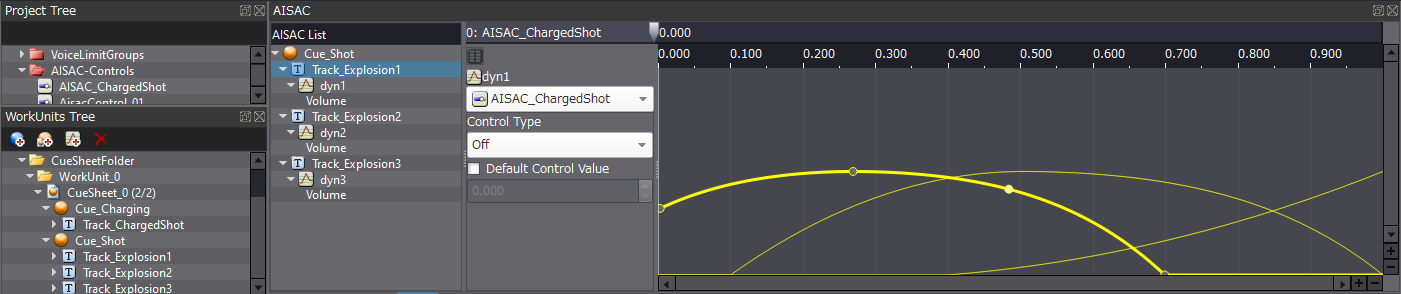
- Rename AisacControl_00 to “AISAC_ChargedShot”
- Create a Polyphonic Cue named “Cue_Charging”
- Import corresponding Material onto new Track
- Create a Polyphonic Cue named “Cue_Shot”
- Import 3 Materials of increasing intensity to separate Tracks
- Add an AISAC to each Track set to the following:
- ASAIC Name – “dyn1”, “dyn2”, “dyn3” respectively
- AISAC Control – AISAC_ChargedShot
- AISAC Graph Type – Volume
- Finesse curves to create a natural transition
This is all will need to prototype our charged shot system. We can build our project now, making sure to generate the necessary Unity Assets.
Unity
To create our charged shot, we will need to start a counter when input is received, and then calculate how much time has passed since then. We can then use this to scale our audio and even our visual effects. The length of time is arbitrary and will depend on the gameplay design. Since we’re only designing the sound, we can decide on any amount of Charge Time, so let’s go with 1.5 seconds (the sound will need to be designed to fit this length).
using System.Collections;
using System.Collections.Generic;
using UnityEngine;

public class PowerShot : MonoBehaviour
{
    public ParticleSystem particles;
    public float chargeTime = 1.5f;
    private float counter;
    bool isCharging = false;

    CriAtomSource source;

    void Start()
    {
        source = gameObject.GetComponent();
    }

    // Update is called once per frame
    void Update()
    {
        if (Input.GetKeyDown("space"))
        {
            isCharging = true;
            source.Play("Cue_Charging");
            counter = Time.time;
        }


        if (Input.GetKeyUp("space") || (Time.time - counter) > chargeTime)
            if (isCharging)
            {
                isCharging = false;
                float chargeAmount = Time.time - counter;

                // Dynamic Audio
                source.SetAisacControl("AISAC_ChargedShot", chargeAmount / chargeTime);
                source.Stop();
                source.Play("Cue_Shot");

                // Dynamic Particles
                var main = particles.main;
                main.startSpeedMultiplier = chargeAmount * 60;
                var light = particles.lights;
                light.intensityMultiplier = chargeAmount / chargeTime;
                particles.Play();
            }
    }
}
As we can see, there isn’t much code required to control our audio. To facilitate our goals, the script above is doing the following:
First, it checks if the “space” key is down. If it is, it:
- Sets the Boolean state of isCharging to true
- Plays the appropriate Cue
- Resets the counter variable
The script then checks if the “space” key is released, or if our counter has expired (chargeTime). We then check that it’s true that our gun isCharging; otherwise, the code will trigger a “Cue_Shot” Cue (even though we might not be charging anything at that time). If all the above conditions are met, our script then:
- Sets the Boolean state of isCharging to false
- Calculates how much time has passed since “space” was pressed
- Sets our AISAC_ChargedShot value relative to how long we’ve charged our shot
- Stops the “Cue_Charging” Cue
- Plays the “Cue_Shot” Cue
The latter part of the code is some fun visual manipulation that changes the light intensity and overall speed of some particles in the Scene based on the elapsed charge time. Playing around with visuals can help to give a better-contextualised sense of the appropriateness of the sound. Overall, ADX2 makes it easy to create these sorts of responsive user-controlled audio systems.