
ADX and Unity Visual Scripting
Unity Visual Scripting, released as an official feature in Unity 2021, allows for the implementation of game logic without writing code. Both programmers and non-programmers can use visual, node-based graphs – not unlike Unreal Blueprints – to design the final logic behind game levels or quickly create prototypes.
In this post, we will see how to access the features provided by the Criware Unity Plug-in from Unity Visual Scripting.
Setup
In order to use the Criware-related classes as Visual Scripting nodes, they must be added manually after importing the Criware Unity Plug-in into your project.
- In the menu, go to Edit, Project Settings.
- Click on the Visual Scripting category.
- Expand the Node Library list.
- At the end of the list click on the + button, and add the CriWare.Runtime assembly.
- If you are using the Asset Support Add-on, add the Criware.Assets.Runtime instead.
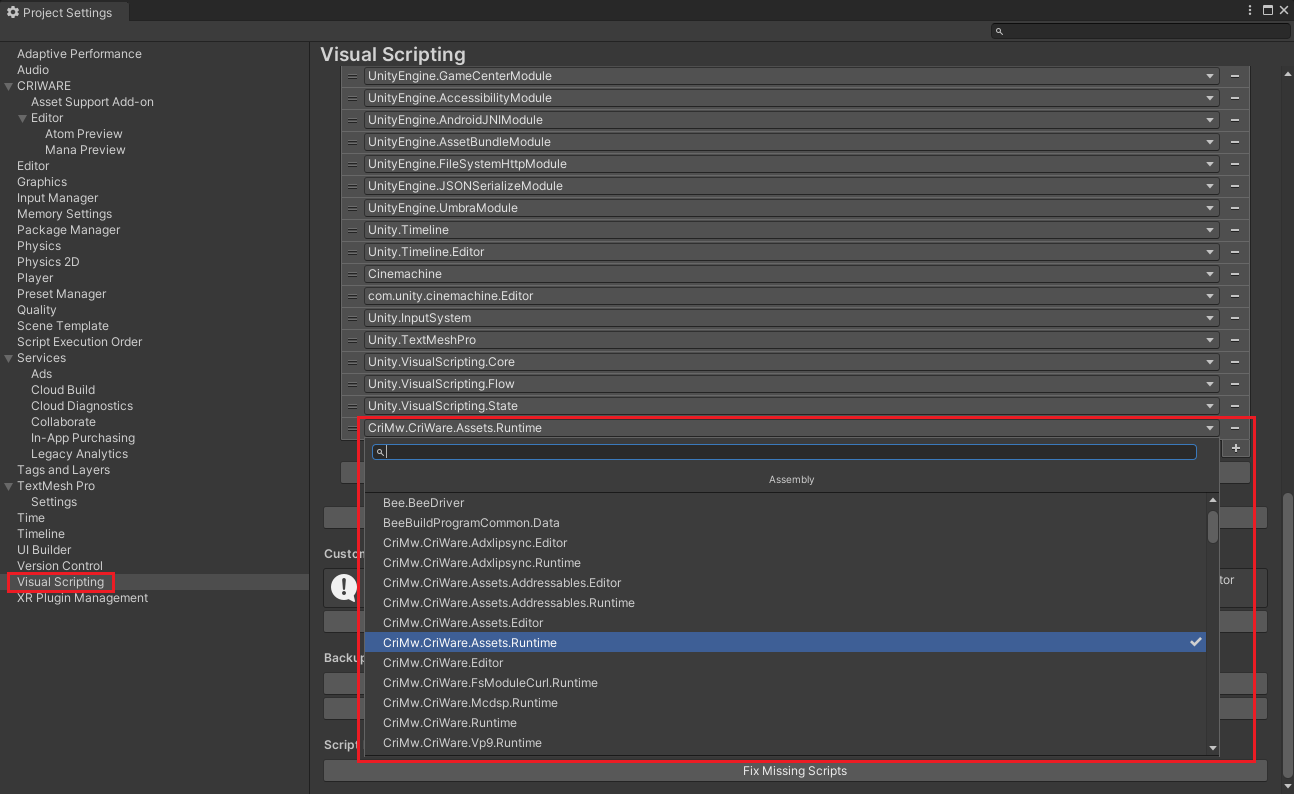
- Then, expand the Type Options list.
- Click on the + button at the end of the list, and add Cri Atom Source or Cri Atom Source For Asset (with Cri Atom Assets optionally), depending on your configuration.
- Finally, click on the Regenerate Nodes button to add the Criware-related nodes.

To check that everything is working you can create a really simple script:
- In your scene, create a new Game Object.
- Add a Cri Atom Source component to the game object, and select the Cue you want to play.
- Below, add a Script Machine component, and create a New script from there.
- Click on Edit Script to open the Script Graph window: you should see an empty graph with only the On Start and On Update nodes.
- Right-click on the graph to open the node selector, and type Cri Atom Source to see every node available.
- Select the Play() node to add it to the graph.
- Then, connect the output of the On Start node to the input of the Play node.
- Now launch your Scene. You should hear the Cue being played from the start.

Some examples
Within Unity Visual Scripting, many functions and logic nodes are available to help you build scripts.
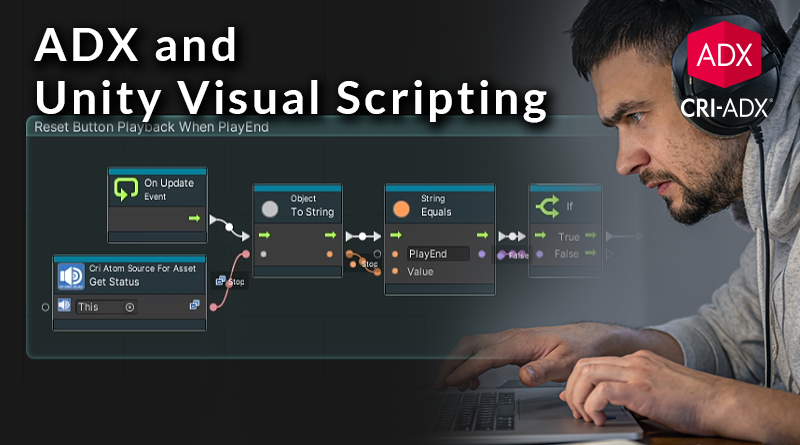
In the following example, we created a small system that plays a cue when a button is clicked and stops when clicked again. We simply use the Once node to trigger the Play and Stop node alternately. Should the Cue be allowed to play until the end, extra logic was added to reset the button behavior. In order to achieve this, the Cri Atom Source’s Get Status node is used to reset the Once node when the Cue sends a PlayEnd message.
In the second script, we change the value of an Aisac by moving a slider. A Set Aisac Control node is connected to an On Start node. Coupled with a Slider Get Value node, this allows us to initialize the value of the targeted Aisac. Then, the On Slider Value Changed node forces the Set Aisac Control node to update the value when the slider is moving.
Visual Scripting is very helpful when it comes to creating small scripts and quick prototypes. If you are not a programmer, this will allow you to be more independent when implementing audio with ADX.