
Designing Spaceship Engines
Following up on last month’s post in which we designed and implemented sci-fi weapons, this time we will focus on the creation of a spaceship engine in AtomCraft.
Sound Creation
What makes the design of a spaceship engine especially interesting is the vast range of sound sources that can be used: vehicle engines, servo motors, synthesizers, and so on. Here, we went for a fully synthetic engine.
Since Atom Craft would need to use pitch shifting to change the engine speed – which may sound unnatural for extreme values – we decided to blend several sounds at different RPM.
To achieve this, we used GameSynth as it conveniently allowed us to generate and export all the engine sounds with increasing speeds in a single click. In addition, we also made a reactor noise, that will be used as an extra layer in AtomCraft. Only one instance of this sound is needed.
Before importing the samples in AtomCraft, seamless loops must be edited in a DAW. Since we rendered 10 seconds for each sound and the RPM is stable, the operation is straightforward. Of course, once in the DAW, you can also process the sound to your liking.
Cues and AISAC
Once the loops are ready, follow these steps for the creation of the Cues in AtomCraft:
- Import your sounds in the Materials folder
- Change the Override Loop information Flag property to True to ensure that all the Materials will loop.
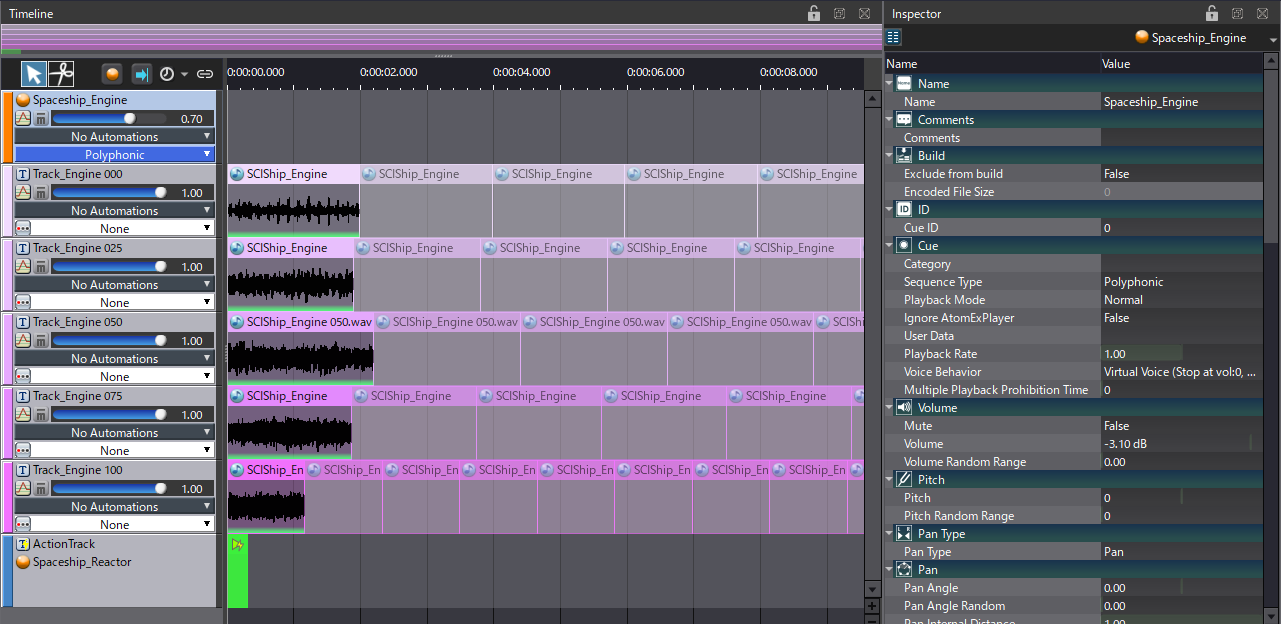
- For the engine, create a Polyphonic Cue. Drop the engine sounds on it, creating one Track per sound, going from the lowest to the highest RPM.
- For the reactor sound, use another Polyphonic Cue with a single Track for the remaining sound.
- In both Cues, set the Voice Behavior to Virtual Voice Retrigger to save resources when the volume equals 0.
- Add an Action Track to the engine Cue with a Start Action at the beginning of the timeline.
- Drag and drop the reactor Cue on the Track’s header to reference it in the Action. By doing so, starting the engine Cue will also trigger the reactor Cue, while still allowing us to process the two Cues separately later.
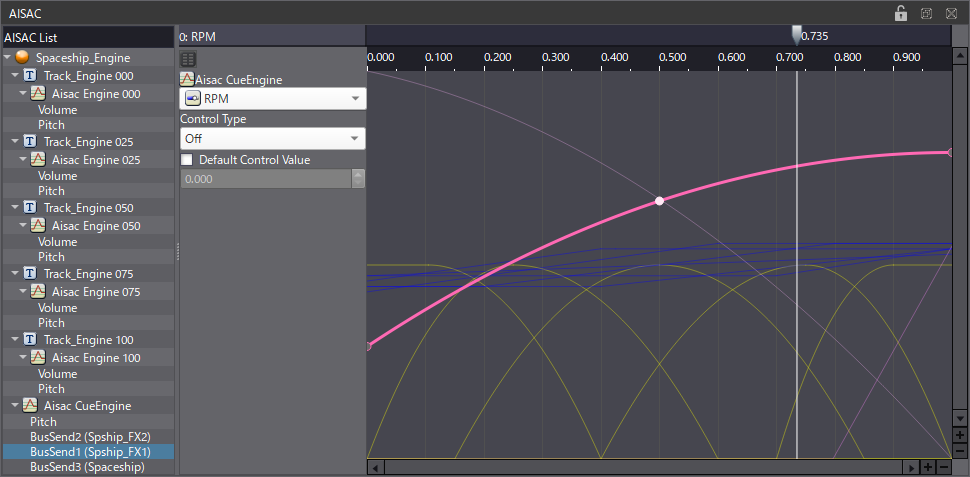
At this point, the engine Cue will play all the sounds simultaneously: we will use an AISAC to cross-fade between them, based on the speed of the engine.
- Create an AISAC-Control called RPM.
- Then, for each Track in your Cue, create a Volume graph controlled by the RPM AISAC.
- In the AISAC editor, shape the graphs so that each Track cross-fades with the following one. Try to distribute your cross-fades regularly along the AISAC by making bell-shaped curves.
The pitch of each Track also needs to be automated. It will allow us to smoothly blend two sounds that were originally at different RPMs when cross-fading.
- For each Track, create a Pitch graph.
- Then create an increasing (linear) curve that matches the duration of your Volume For better results, a pitch value of 0 should correspond to the top of your volume curve.
You will probably have to adjust the pitch curves for each Track so that it matches both the previous and next sounds. Usually, the range should not be higher than -500/500 cents for the sound to stay natural. Adding another Pitch graph at the Cue level will allow you to adjust the pitch range globally.

The reactor Cue can use much simpler volume and pitch graphs (also controlled by the RPM AISAC). The volume should be like a fade-in, with a slow curve, while the pitch is just a linear curve going from -140 to 500 cents. The result is a reactor sound that becomes louder as the RPM increase.
Routing and Effects
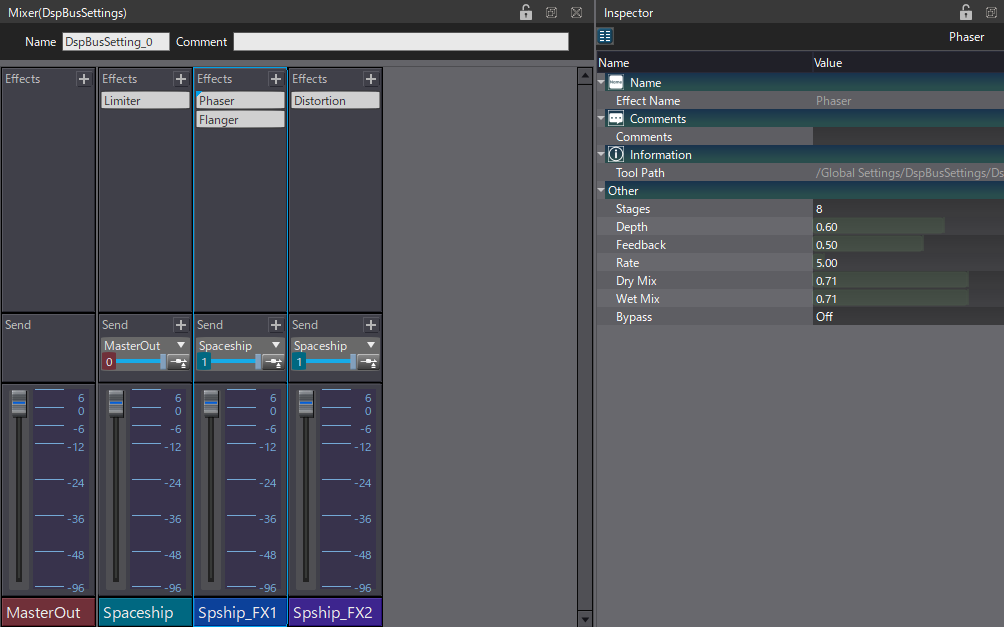
Adding effects will make the sound livelier and more interesting. Phaser and Flanger effects are good candidates to add the right amount of modulation to this type of sound.
In the Mixer Panel:
- Create three new DSP Buses: Spaceship, FX1, and FX2.
- Send FX1 and 2 to the Spaceship bus.
- Add Phaser and Flanger effects on FX1, and set the parameters in the Inspector to your liking.
- Add Distortion on the FX2 bus.
It will allow us to use different send levels for each Cue. To create and control the routing for each Cue:
- In the Project Tree, update your BusMap_Default settings with Spaceship, FX1 and FX2 as DspBusName1 to 3.
- In the BusMap For AISAC and Automation, also add the same three buses.
The buses are now available as sends in the Cue’s properties, and as targets for the AISAC.
- Select the engine Cue and, in the Inspector, enable the three buses.
- Do the same for the reactor Cue but let the FX1 bus disabled, as we do not want it to be processed by the Phaser and Flanger.
- Do not hesitate to lower the amount of send to avoid clipping.
Finally, the send amounts will be controlled by the RPM AISAC:
- For the reactor Cue, add two BusSend graphs targeting the Spaceship and FX2 buses.
- As the RPM increases, lower the Spaceship BusSend while increasing the FX2 send: the sound of the reactor will therefore progressively get distorted as the RPM goes higher.
- Do the same for the engine Cue, but also add the graph for the FX1 BusSend. The send level to the Phaser and Flanger should also increase with the RPM, creating a more modulated sound at high speed.
You can download the demo project below and experiment by replacing the materials with your own sounds, by adding new layers and effects.
 AtomCraft_Project_Spaceship_Engine.zip