

Using Reverb in AtomCraft
Reverberation conveys spatial information to the player, making a soundscape more realistic. In this post, we examine the pros and cons of the various reverberation effects available in ADX.
Bus architecture
In ADX, the reverberation effects are applied globally on a DspBus, rather than on each Cue individually. The sense of space is usually the same in a scene, and this effect is relatively heavy on the CPU, so this is convenient. To have more control over the amount of reverb applied, it is recommended to insert the effect on an auxiliary bus. This means that the Cues will be sent to two busses, one used for mixing that controls the dry signal, and the other for the reverb, controlling the wet signal. Both busses will then be mixed together and sent to the output.
If every Cue routed to the mixing bus needs to be processed by the reverb (for instance for character Foley or diegetic voices), add a send on this bus to the reverb aux.
- On the bus, under the Send section, click the + button
- Select the reverb bus
- Adjust the send amount using the slider
Now each Cue routed through that bus will also have reverberation. In the example below we routed all the reverb busses to a general Aux Reverb bus, in order to be able to control the volume of all the reverbs from a single bus.
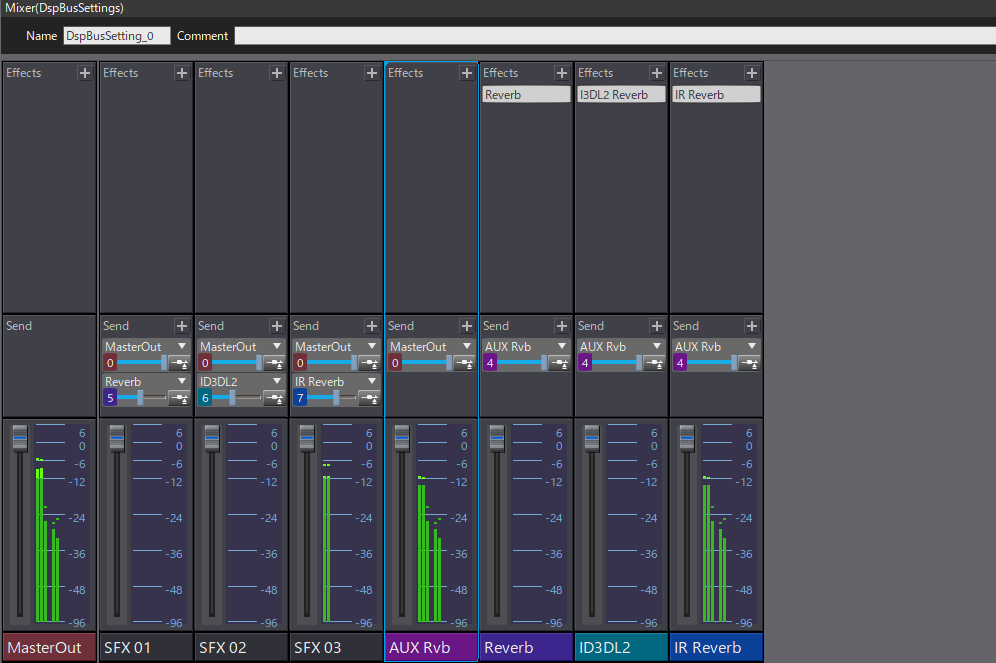
However, if more granulation is needed over which Cues to send to the reverb, a dedicated BusMap should be created, that includes both the mixing and the reverb busses.
- In the Project Tree, create a new BusMap and add the mixing and the reverb bus
- Select a Cue and navigate to the Bus Send section in the Inspector
- Select the newly created BusMap
- Set the send level for each bus

Reverb
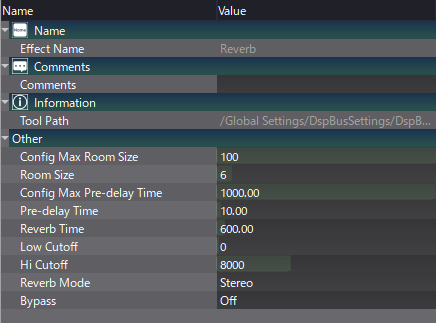
Several reverberation effects are available in ADX. The Reverb effect is the simplest one. Its processing load is relatively low but it doesn’t handle very well long reverberation. It is therefore more suited for smaller spaces. Also note that although it can accept up to 8 channels, the inputs will be downmixed to mono and then expanded to the chosen output format. In other words, spatialization will be lost for the signal passing through the reverb.
Use this effect when spatialization is not important (for instance for UI sounds) or when CPU resources are limited (e.g., when developing for mobile platforms). Reducing the maximum room size and the maximum pre-delay length will improve memory consumption.
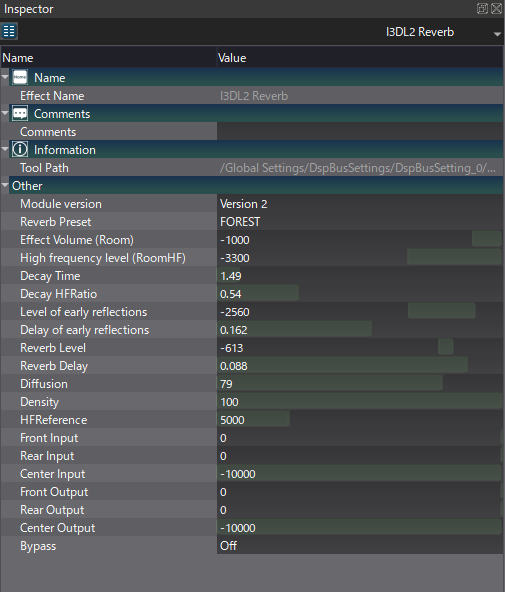
I3DL2 Reverb
Contrarily to the previous reverb, the I3DL2 reverb (which stands for Interactive 3D Audio Rendering Guidelines, Level 2) is truly multichannel (up to 8 channels), offering proper spatialization. There are also more parameters available (mirroring the I3DL2 standard) that allow for the simulation of a wide variety of spaces, including outside environment. Since setting up the reverb is more complex, several presets are included for typical uses.
Unsurprisingly, the processing load is higher than with the classic Reverb, so it is recommended to avoid using too many instances of the I3DL2 reverb simultaneously. Reducing Decay Time, Diffusion, Density or Delay of the early reflections will also save some resources.
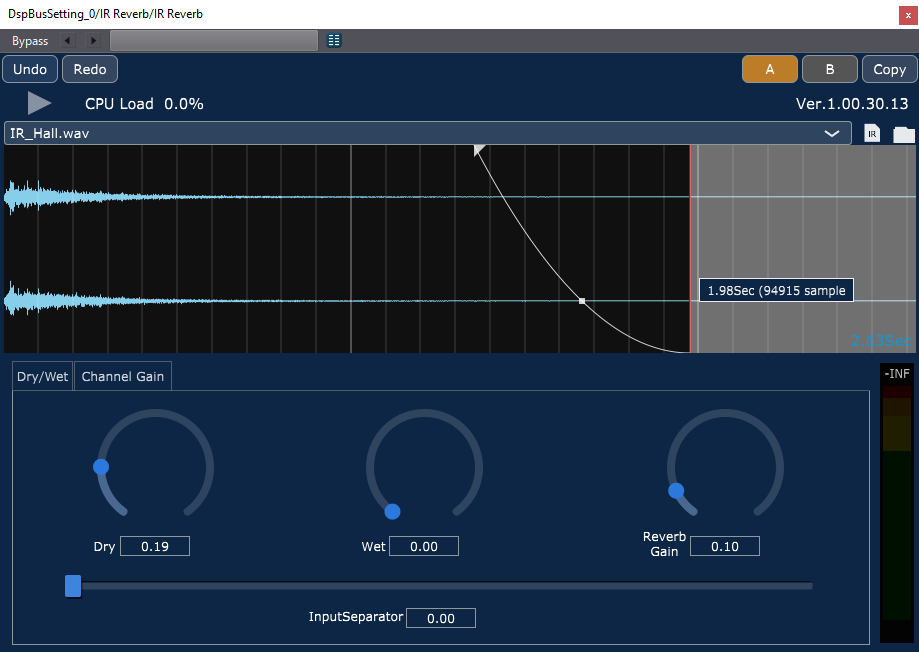
IR Reverb
The IR Reverb is a multichannel convolution reverb. This is the best option to simulate realistic spaces, as it allows for the loading of impulse responses (IR) files.
Please note that the IR Reverb is not provided as part of the regular AtomCraft distribution but is available upon request as a separate download. Contact our support if you want to try the IR Reverb in your project.
While the convolution reverb will give you the most natural results, it is also the less flexible type of reverb with just a few parameters to play with. It also comes with a higher processing load and a higher memory footprint, which depends on the size of the IR files loaded.
To mitigate the impact on the resources, it is possible to shorten the IR file and set up a fade-out directly in the IR Reverb window. Using IR with less channels (e.g., mono instead of stereo) will also help, as will reducing the FFT block size in the settings.
It is possible to load several impulse responses in a single instance of the reverb, for example allowing to switch between different spaces depending on which room the player is in.
You can try the different reverbs in the project below. As mentioned previously, the IR Reverb will be shown as “Not Found” unless you installed it separately.
 AtomCraft_Project_Reverb.zip