

Radio Voice Effect
Radio and communication effects are common in games, especially in modern military settings. In this post, we will see how to recreate a radio effect in Atom Craft and how to make it more dynamic.
Routing
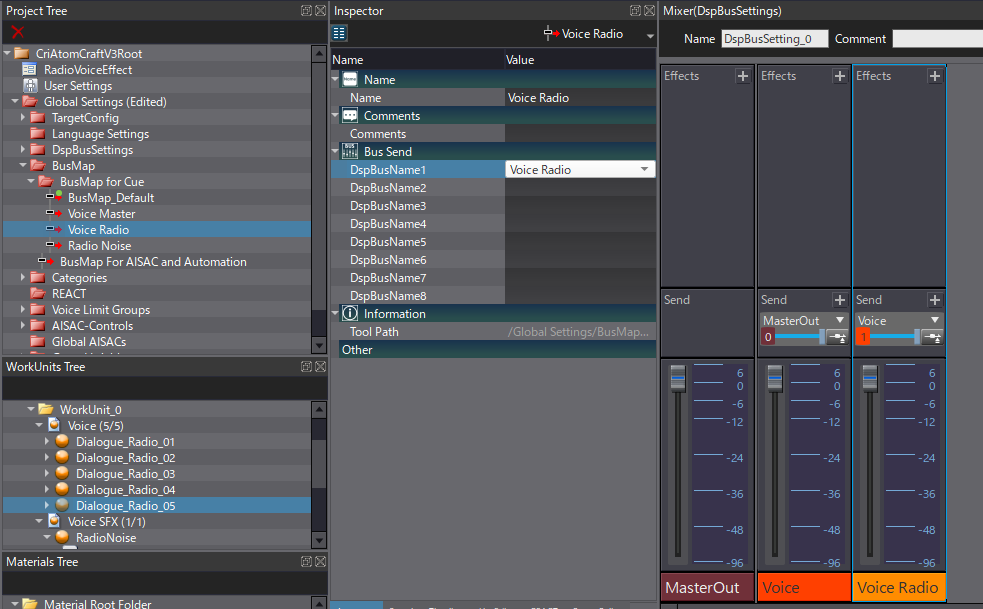
DSP Busses must be created in order to route the Cues to the processing chain. A general “Voice” bus is typically created, along with dedicated sub-busses to perform the different effects needed in the game: reverberation for different locations, radio effect, inner voice effect etc.
- In the Mixer window, right-click on a blank space and create 2 new DSP Busses
- Call the first one “Voice” and keep it routed to the MasterOut
- Call the second one “Voice Radio” and route it to the Voice bus
To be able to assign the dialogue Cues to that bus, a BusMap also needs to be created:
- In the Project Tree, select BusMap > BusMap for Cue and create a new BusMap called “Voice Radio”
- In the Inspector, change the DspBusName1 property to Voice Radio
- Finally, select the Cues or the Cue Sheets of interest, and change the BusMap property in the Inspector to Voice Radio
These Cues will now be routed to the Voice Radio bus, allowing them to be processed.
DSP Effects
To simulate the sound emitted by a radio, the spectral and dynamic ranges need to be reduced, and the audio degraded.
- In the Mixer window, click the + icon in the Effects section of the Voice Radio bus, and add a Bandpass, a Distortion, a 32-Bands EQ and a Compressor (in that order)
- Set the Bandpass between 500 and 10000Hz to reduce a bit the frequency range
- For the Distortion, set the Drive to 24.00dB
- Then, to recreate the frequency response of a low-fi speaker, the 32-Bands EQ should have two Bands of Peaking type around 1000 and 2000Hz, and two other Bands configured as LowShelf and HighShelf around 700Hz and 4000Hz respectively
- Finally, the dynamic range will be reduced with the Compressor, using a Threshold set to -40dB, a Ratio set to 14, and a Gain set to 6dB
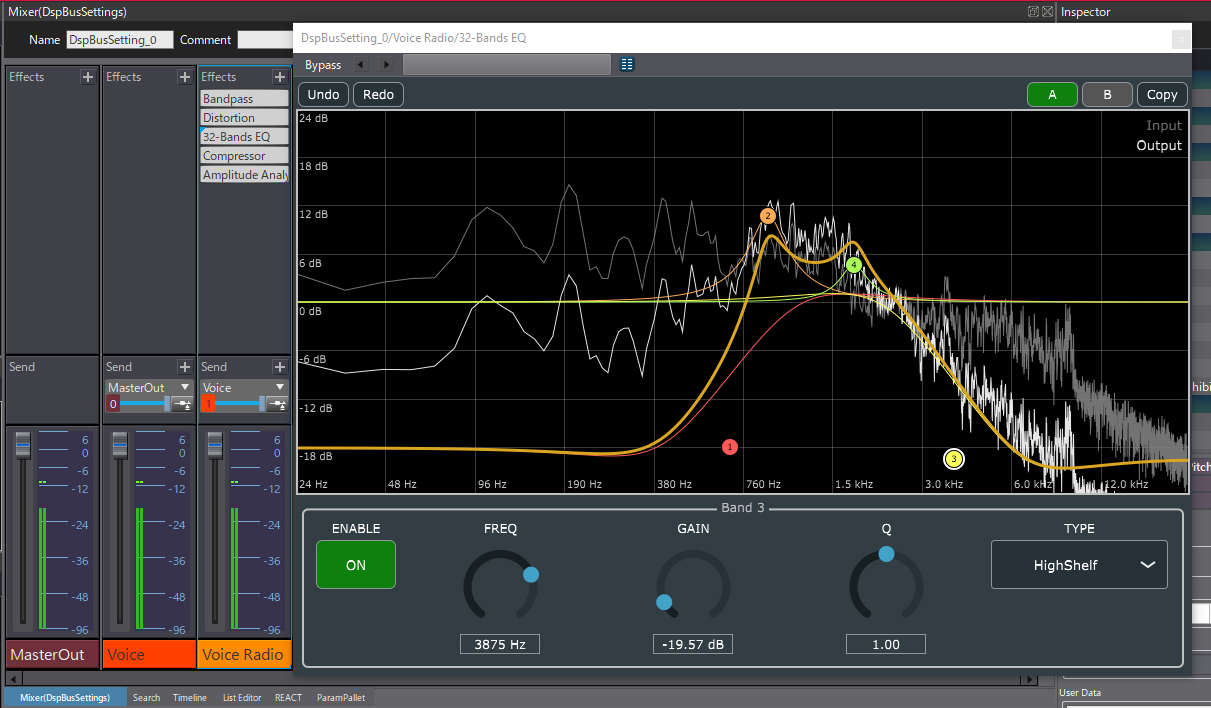
The 32-Bands EQ settings can easily be tweaked to create a frequency response that matches the devices in the game. Simply moving the peaks will instantly create a new sonic signature.
The Distortion can be moved up and down the processing chain, e.g., after the EQ or the Compressor, to get different types of effects. Make sure to adjust the Drive property as the sound level may become much louder once the effect is lower in the chain.
Dynamic Interference
The processing chain described above already produces a convincing radio effect that will work in most situations. It may still sound a bit too clean in some cases though. This can be improved by adding interferences to the signal, to make it sound more organic.
To achieve this, a new Cue containing looping static noise is created and routed to a new DSP Bus (let’s call it “Radio Noise”), itself routed to the general “Voice” bus.
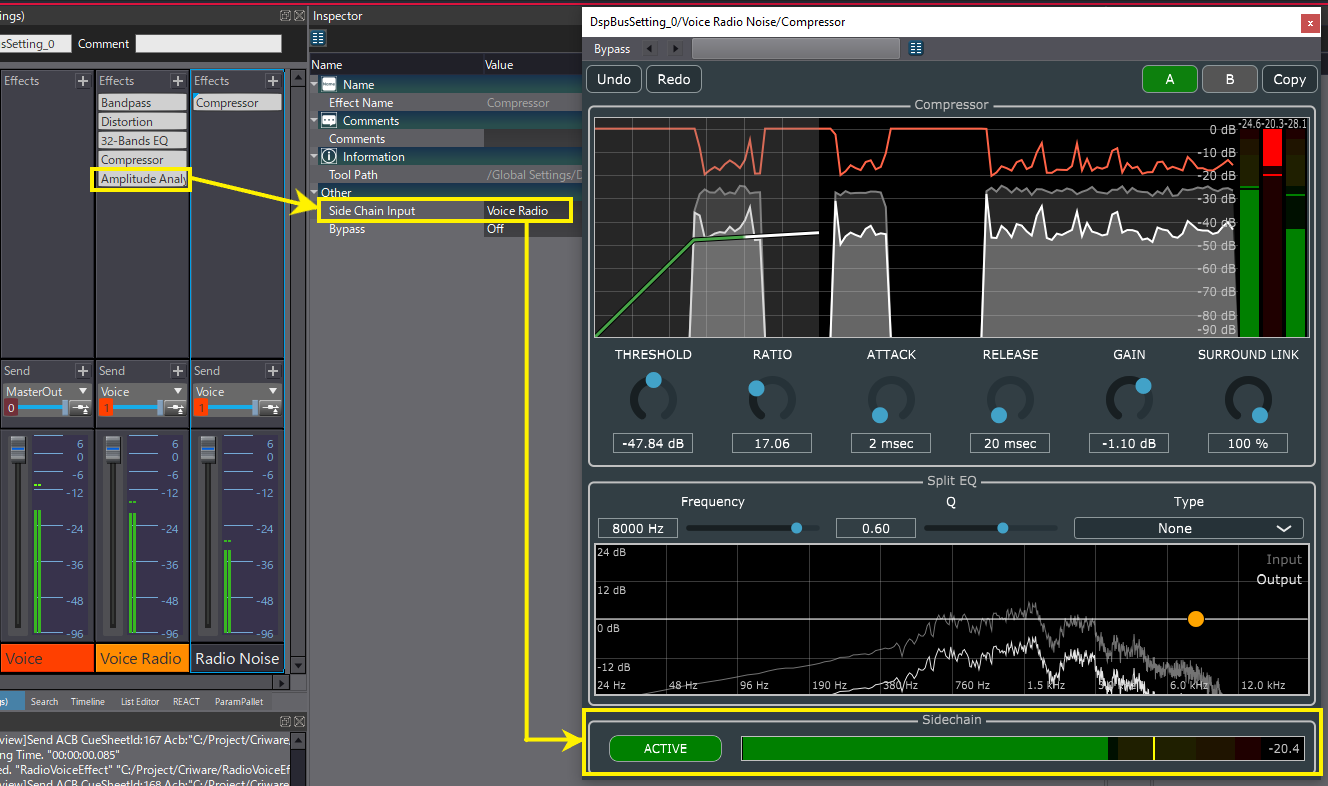
The noise will be played alongside the dialogue lines. By using the side-chain function of the Compressor, it can be driven by the voice level, thus creating dynamic interferences:
- On the Voice Radio bus, add an Amplitude Analyzer at the end of the chain
- Then, on the Radio Noise bus, add a Compressor.
- In the Inspector, change the Side Chain Input property to Voice Radio
The Amplitude Analyzer is basically an envelope follower that sends the output of the Voice Radio bus directly to the side chain input of the Radio Noise Compressor. The Compressor will therefore reduce the gain of the static noise, but only when it receives a signal from the Voice Radio bus, where our dialogue is routed. The Compressor settings are: Threshold = -45dB, Ratio = 17, Attack = 2ms and Release = 20ms (to allow for a fast response), Gain = -1.5dB. The Sidechain input at the bottom should be set to Active.
Now, when playing the static noise Cue simultaneously with the dialogue lines, the noise level is reduced whenever the character is talking, and increases back to its initial level during a silent phase.
For this demonstration, the static noise Cue is started via Start and Stop Actions added directly to the dialogue Cues. This would of course be impracticable with a large number of dialogue Cues. Instead, it is recommended to play the noise Cue for the exact duration of a dialogue line on the programming side. By using Categories, the system can be applied to the right Cues, and will be resilient to any change that may occur to the dialogue lines.
Download the demo project below to see the system in action!
 AtomCraft_Project_RadioVoiceEffect.zip