

ADX Beginner’s Guide #15 – Building Binary Data
During this beginner’s guide, you learned to implement interactive audio, from sound effects to dynamic music and dialog (in our previous blog). You also learned how to control these sounds in real-time, and how to mix them. Although you can now author all the audio for your game in AtomCraft, in order to use these sounds in your game engine, you will need to export the project as binary data.
Encoding and Streaming Types
Before building your data, one of the first things you want to check is the encoding settings of your Materials. As audio data can take up a lot of space, it is necessary to encode and compress it.
The relevant settings can be found:
- In the Target Config: these are the default settings that will be applied to the Materials for the entire project.
- In the Materials and Materials Folders: the encoding settings at the Material’s level override the Target Config’s settings. This provides more granularity, allowing you to use the optimal encoding for each type of sound.
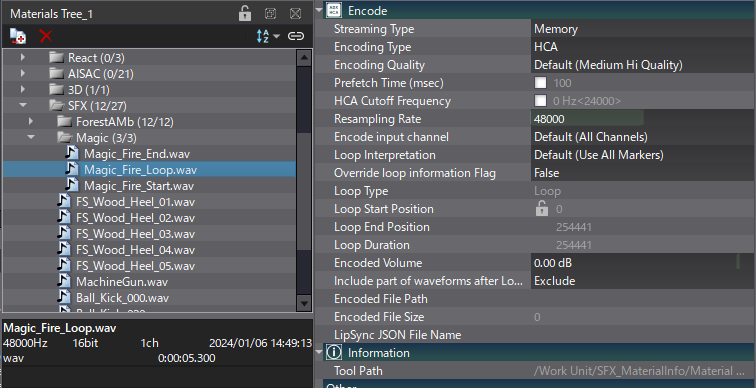
The Encoding Type defines the type of codec used to compress the Material’s audio data. ADX lets you choose between CRIWARE’s proprietary codecs and the ones provided by the console manufacturers. CRIWARE’s own codecs provide high-fidelity and high-ratio compression for a low CPU load. They also provide a consistent user experience when doing cross-platform development.
Here is a brief description of the three CRIWARE codecs:
- ADX: this is a high-quality, low CPU-load codec with a compression ratio of about 1/4. Although the compression ratio is lower than with the other codecs, it can play a lot of voices while staying very low on the CPU load, as the decoding is very lightweight.
- HCA: this is a high-quality, high-compression codec with a maximum compression ratio of 1/16. This compression ratio is comparable to general-purpose audio codecs such as MP3 or AAC. However, this codec has been carefully tuned for games: not only is the CPU load very low compared to standard codecs, but it is also stable during the decoding process (without any spike) and it supports seeking. In most cases, this will be the recommended codec.
- HCA-MX: with this codec, the HCA data is encoded to reduce the CPU load even further when playing back a large number of sounds simultaneously. HCA-MX is a playback method where HCA data is mixed before decoding, which means that to achieve an even lower CPU load, some functions such as filtering, pitch modulation, or seamless concatenated playback are not possible.
Once the Encoding type is set, you can select the Streaming Type, which indicates how the Materials are played back. This will impact how the binary data is built.
The three Streaming Types are:
- Memory: The sound is played from the platform’s memory. This is the recommended streaming type for short sounds that rely on precise timing, as they are immediately available for playback.
- Stream: The sound is streamed from the platform’s media storage, which introduces some latency when loading the sound. It is recommended for sounds where timing is not critical, such as ambience and sometimes music.
- Zero Latency Stream: The first part of the sound data is prefetched for memory playback, and once the streaming buffer is ready, the playback is switched to the streaming type. This is a hybrid playback method between Memory and Stream. In this method, playback is possible with the same latency as memory playback (at the cost of using a bit more memory). The Prefetch Time can be adjusted.
Generating the Binary Data
Once the appropriate encoding and streaming settings have been set for your Materials, the project and Cue Sheet binary files can be built.
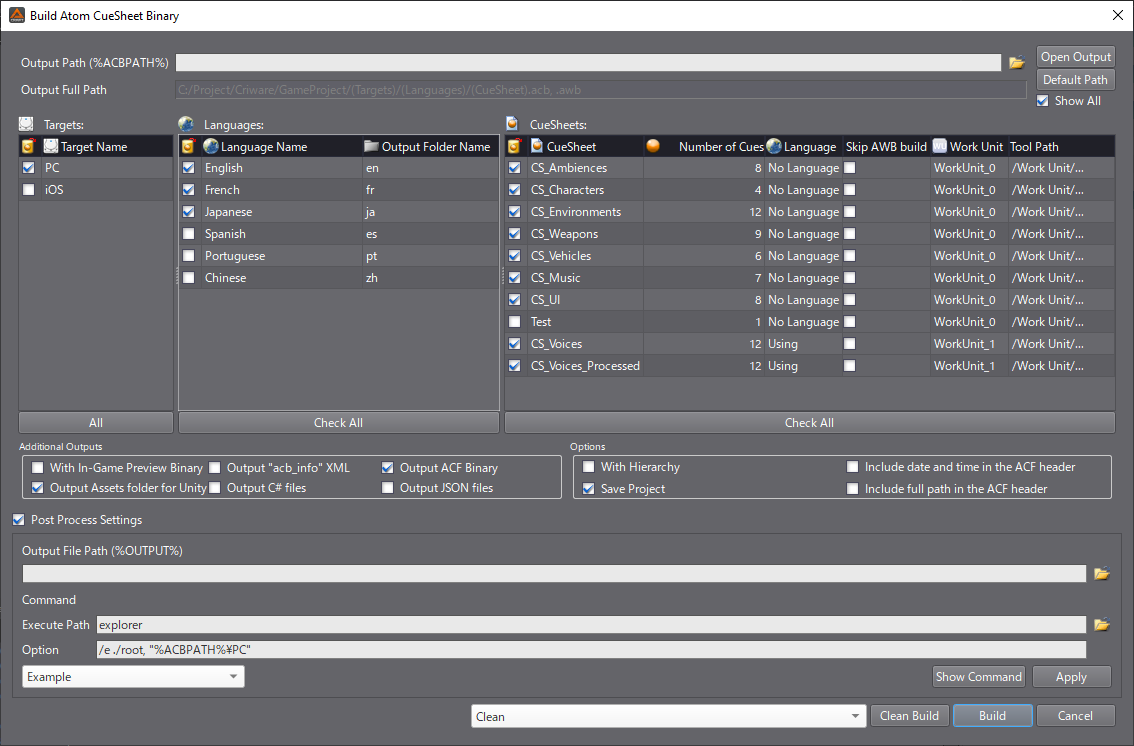
- In the Build menu, select Build Atom CueSheet Binary.
- In the Build window, select the Cue Sheets you want to build. You also must choose the target platform and language. Note that multilingual Cue Sheets are only built for Cue Sheets containing language-dependent Waveform Regions.
- Additional options are available, such as generating files that list the content of the project in different file formats (XML, JSON, C#, etc.) or binaries used for in-game preview.
- Post-processes can also be launched. For instance, you may want to automatically open the build folder after the generation of the binaries or copy the files to your game asset folder.
- Once the build process is complete, a log is generated to check for errors.
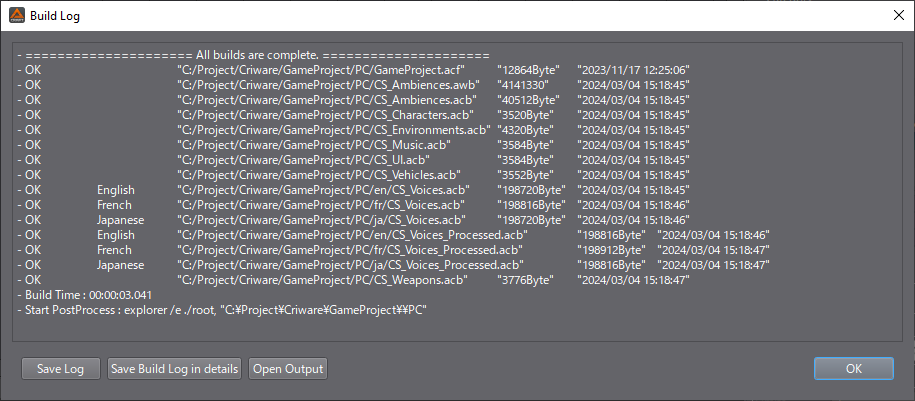
One folder per platform (containing the binaries of the selected Cue Sheets) will be generated.
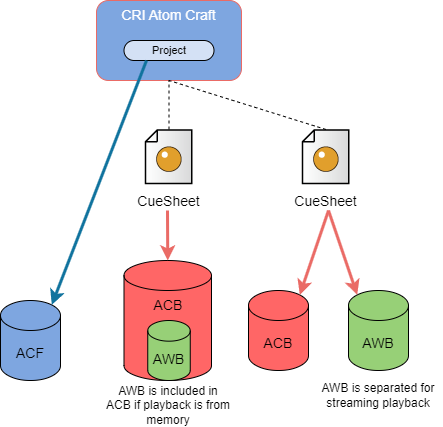
In this folder, you will find an ACF file, with an ACB file for each Cue Sheet, sometimes accompanied by AWB files. In addition, a header file that defines the Cue IDs is generated for each Cue Sheet.
It is important to understand what the binary files contain:
- ACF: the ACF file (for Atom Configuration File) contains the project settings and the information common to all Cue Sheets (Categories, AISACs, DSP Bus Settings, etc.). A single ACF file is generated per project. The ACB files will refer to this ACF file. Therefore, whenever the ACF file is updated, all the ACB files must be updated as well.
- ACB: an ACB file (Atom Cue Sheet Binary) contains the information about the Cues associated with a Cue Sheet: their parameters and their compressed waveforms used for memory playback. The ACB files are the equivalent of sound banks in other audio middleware and are essential to loading and playing the Cues in the game.
- AWB: an AWB File (Atom Wave Bank file) contains waveform data used for the streaming playback of a specific Cue Sheet. It refers to the corresponding ACB file to get the parameters needed for playback. The AWB file is generated when the ACB file is built, but only if the Cue Sheet references one or more Materials whose Streaming Type is set to Stream. It will not be generated if all the materials referenced by the Cue Sheet are to be played from memory.
The game will first need to load the ACF file, which is used to configure the runtime environment. Then, the ACB files are loaded to play the desired Cues. When loading an ACB file, the corresponding AWB file must be specified if it exists. If you are using the ADX plugins for Unity or Unreal Engine, you can usually assign these files directly in the plugin components.
CRI Atom Viewer
Atom Craft comes with a very useful tool called Atom Viewer. Atom Viewer can be used to check the contents of the ACB/AWB and ACF files that are generated by Atom Craft without the need to open the entire game project.
Atom Viewer allows you to listen to the audio embedded in the binary files. This way you can pre-listen to files that have been encoded, exactly as they would be decoded and played in the game. This can be useful to compare different compression settings and codecs early.
Additionally, the tool can preview audio with 3D positioning and AISAC.
To use the Atom Viewer:
- Simply drag and drop ACF, ACB, or AWB files onto the tool.
- Or if the binary data is already built, right-click on a Cue Sheet in Atom Craft and click on Open CRI Atom Viewer to load the ACB directly in Atom Viewer alongside its related ACF and AWB files.
With the project data built, the last step is to preview, test, and monitor the behavior of our Cues. This will be the topic of the next – and last – post in this beginner’s guide.