

ADX Beginner’s Guide #13 – Interactive Music with Block Playback
After learning how to implement interactive music with ADX by using AISACs and Selectors, we will this time examine another related feature: Block Playback.
What is Block Playback?
It is possible to arrange the sequence of a Cue into several sections called Blocks. The order and conditions in which these Blocks are played back can be predetermined, randomized, and/or triggered by in-game events. Unlike a regular Cue, the sequence can be completely non-linear. Although this can be used for any type of audio assets (e.g. dynamic dialog), it is especially useful when implementing interactive music.
For example, you can create a Cue where each Block corresponds to a specific section of a song: introduction, verse, chorus, break, and conclusion. Because Block Playback allows you to specify what transitions are possible between the blocks, you can easily configure the verses to play in random order, to always play a break after a chorus, or to have an in-game event trigger the conclusion of the song (or any other block), etc.
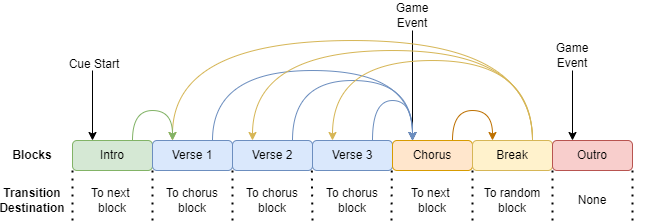
The goal is to create a relatively coherent structure for the music while allowing it to adapt to game states and keeping it from becoming too repetitive.
How to use Block Playback?
As the Blocks divide a Cue sequence into vertical sections, they are especially useful with Polyphonic Cues. Whenever a Block is played back, all the Waveform Regions it contains (on any of its Track) will be played. Objects outside the Block will not be played, so you have to make sure that the length of the Block matches that of your assets. The order of the Blocks can be changed on the Timeline, and all objects within a Block will also be moved. In order to easily organize the structure of the song, you can switch the TimeBase to Bar/Beat, as explained in the previous post.
Of course, to take full advantage of Block Playback, you should design your music assets as short phrases or segments. Then you can build the Cue to your liking. If your memory budget allows it, you can create a full multi-track song with one instrument per track. If it does not, keep your track count to a minimum by premixing each segment of the song.
To add Blocks to a Cue:
- Create as many Tracks as you need.
- Then, right-click on the Cue and select Create Block.
- Adjust the size of the Block to match your assets and create other Blocks. They will be added one after another.
- Now you can drag and drop the Materials on the tracks and into each Block. Remember that the Waveforms Regions will be limited by the size of the Blocks.
- By default, Blocks are configured to jump to the next one when they end. So if you have created two Blocks, Block 2 will start playing when Block 1 ends. Then, the Cue will stop once Block 2 has finished playing because there are no more Blocks.
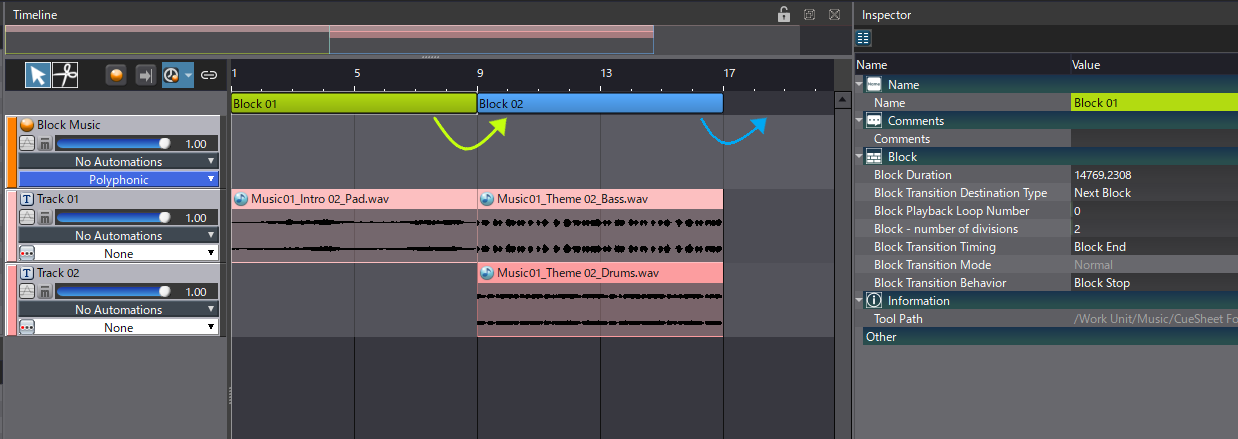
Some properties of Block 2 will need to be changed to avoid this and get continuous music playback:
- One solution is to change the Block Playback Loop Number to -1 so that Block 2 loops indefinitely.
- If you need something less repetitive, you can also change the Block Transition Destination Type to Specify Block Transition Destinations instead of Next Block.
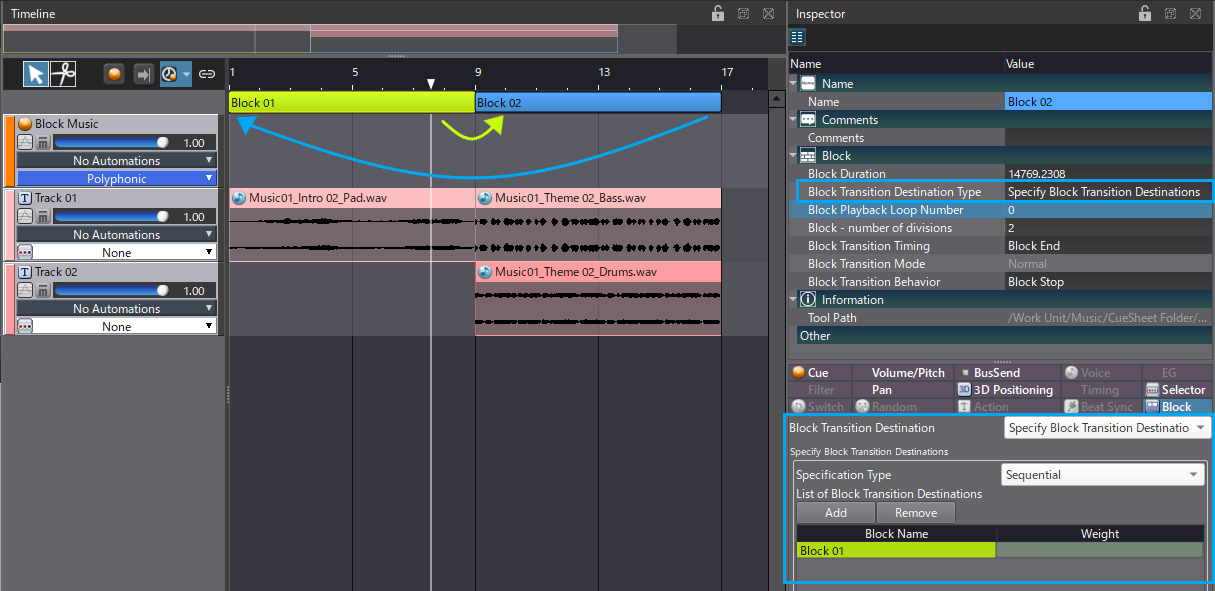
- From there you will be able to set Block 1 as the Block Transition Destination.
At the end of Block 2, the playback will now jump back to Block 1.
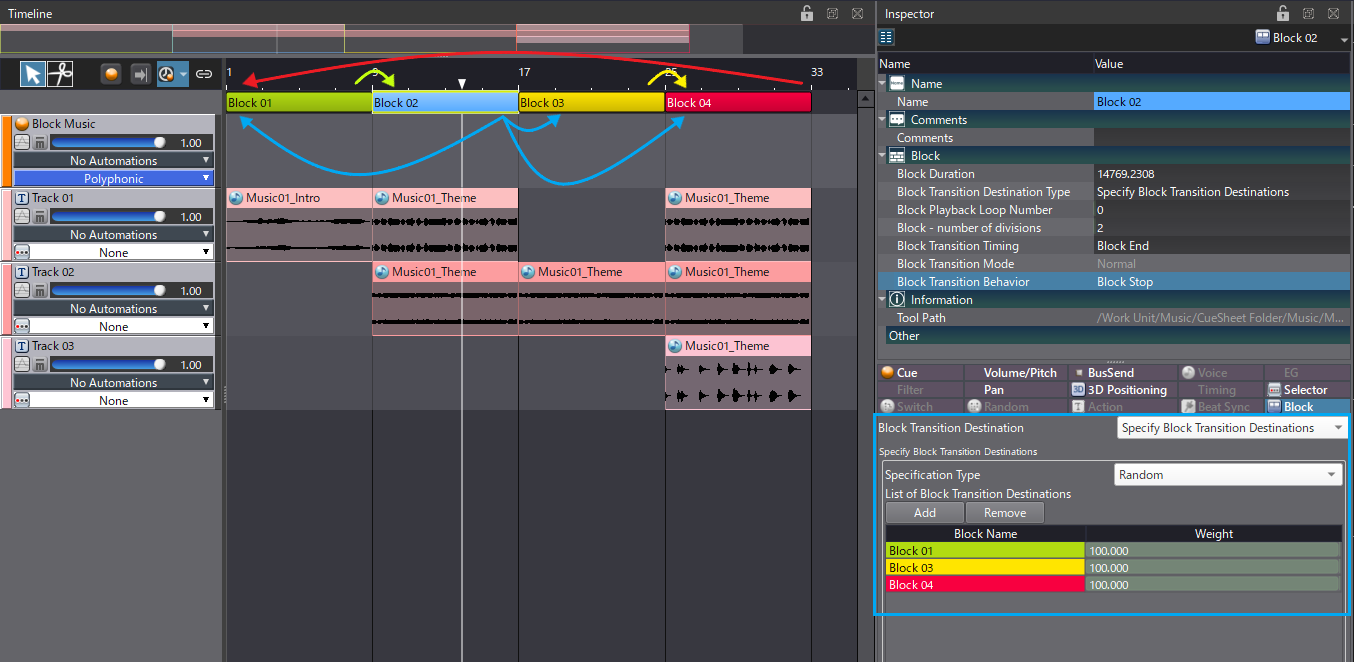
If you add two more Blocks to your Cue, you will be able to create more interesting playback options. For instance, you could decide that at the end of Block 2, the playback will jump randomly to either Block 1, 3, or 4, creating a less repetitive song.
- Select Block 2.
- Then, change the Specification Type property to Random. Specification Type can be set to Sequential, Random, Random No Repeat, or Shuffle.
- Click the Add button to add Blocks 3 and 4 to the list of destinations.
- You can adjust the weight of each Block for the randomization.
Now, at the end of Block 2, the Cue will jump to Block 1, 3, or 4, making the song structure less predictable.
Transition triggered by game events
If ADX receives an event from the game to switch to a specific Block, it will override the destination of the currently playing Block. But, it will still respect the Block Transition Timing which is set to Block End by default, meaning that the transition will occur at the end of the Block.
However, when using a game state to switch to another part of a song, the goal is often to transition relatively quickly, so this could be an issue, especially if your Blocks are long. By setting the Block Transition Timing property to Division, the Block will be divided into several sub-sections whose boundaries can be used as transition points. Since these are divisions of the initial block length, you can still make clean transitions, but with more granularity: in the next two bars, the next bar, the next beat, etc.
Note that if the transition points do not need to occur in sync with the musical structure, the Block Transition Timing property can be set to Immediate.
In Atom Craft, you can simulate transitions triggered by the game by clicking on the Blocks while the Cue plays.
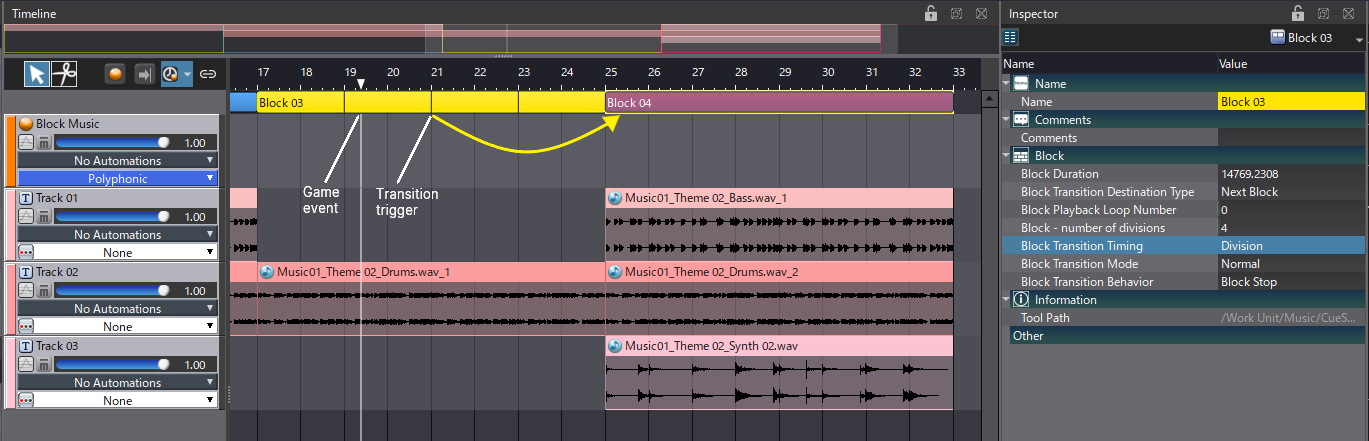
For instance, we can configure Block 3 so that it can reply to a transition triggered by the game every two bars:
- Select Block 3.
- Change Block Transition Timing to Division.
- Since our Blocks have a length of 8 bars, we set the Block Number of Divisions property to 4.
- The Block is now divided in 4 parts.
Now, when Block 3 is being played, if ADX receives an event from the game to play Block 4, the transition will occur when the playback reaches the next division.
Transition stingers
Even with a comprehensive interactive music system using Blocks to cover all possible game states, you may find sometimes that the transitions between Blocks can be too abrupt.
A good solution to this problem is to add a one-shot sound, a stinger, to help with the transition between the two sections. For example, if the introduction doesn’t have a drum layer, you can add a 1-bar drum break that creates a bridge to your main section that already has drums. Not only will this make the transition more natural, but it will also add impact. It is also possible to trigger the stinger immediately after the transition. This can be useful to add a stinger at the beginning of a loop, without retriggering it when the music loops.
Dedicated Tracks must be used to trigger the stingers:
- Add a new Track.
- In the Inspector, change its Block Transition Type to either Playback Transition (to trigger the stinger before the transition) or Playback on the first Transition (to trigger the stinger after).
- Then, depending on which mode you selected, you must place the Waveform Region you want to play either just before the transition point or just after the beginning of the Block.
- Stripes will be displayed on the Track, indicating that the Waveform Region will not play unless a transition occurs.

Here is a video that features a Cue using Block Playback:
You now have all the tools to create great interactive music that will respond to what happens in the game. Of course, you can combine these methods. For instance, there is nothing stopping you from adding some AISACs to a Cue using Block Playback!
In the next post of this beginner’s guide, we will learn how Atom Craft makes it easy to manage your dialogue assets.