

ADX Beginner’s Guide #11 – Dynamic mixing with REACT
In the last post of this beginner’s guide, we learned how Categories can help us organize and control the parameters of a group of Cues. This is precisely what they can do when combined with the REACT system, allowing us to perform dynamic mixing in ADX.
Ducking volume
REACT is a system that lets you define how sounds should change in response to other sounds being played.
REACT has two modes of operation: Ducker and AISAC Mod Trigger.
The ducker is used to change the parameters of the Cues belonging to the target category when a sound from the triggering category is played. In its simplest form, you can temporarily lower the volume of the sounds from the other Categories.
For example, to maintain good intelligibility, you can create a REACT object that lowers the volume of the music Cues every time a dialog Cue is triggered. This is called a ducking effect.
Categories must be set beforehand. Then, a REACT object can be created in the Project Tree:
- In the REACT folder, create a new REACT object.
- In the Inspector, set the REACT Type to Ducker.
- The Changing Category property corresponds to the category that is affected by the parameter change. Set it to the Music category.
- The Trigger Category property corresponds to the category that triggers the change. If a Cue from this category is played back, the volume (or other parameters) of the Cues from the Changing Category is modified. Set it to the Voice category.
- Then, the Change Parameter can be set to Volume Level, and the Change Level Value to 0.15. This means that the volume of the Changing Category will be lowered to 0.15.
- Change Time and Return Time are the times it takes to reach the Change Level value and the time it takes to return to its initial state, respectively. To sound more natural, you usually want the Change Time to be fast (100 to 500 ms), and the Return Time to be longer (1000 to 2000 ms).
- The Hold Type property determines how long the Change Level Value must be maintained. Two modes are possible:
- While Playing: this will maintain the Change Level Value while the Trigger sound is being played back. This is perfect for our case.
- Fixed Time: this will maintain the Change Level Value during the time specified by the Hold Time.
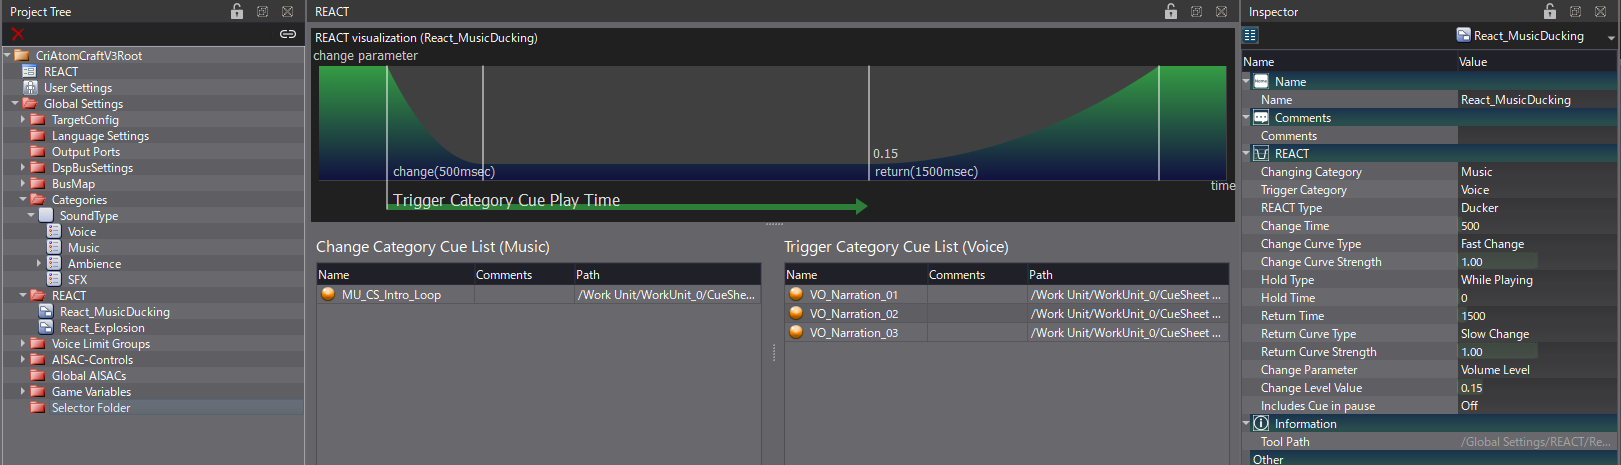
To help you determine how the REACT will affect the sound, you can look at the REACT visualization in the REACT view. The Cues belonging to the Changing and Trigger categories are also listed, so you can check which Cues will affect which.
Once everything is set up, you should now hear the music being automatically ducked by the dialog, like in this video:
Ducking AISAC
Ducking only the volume may not be enough to achieve certain effects. Fortunately, we can also use REACT to change an AISAC Control, which opens up the system to many more parameters.
In addition to changing the volume of a category, ducking an AISAC will also allow you to change its pitch, filtering, pan, etc, enabling more creative effects. Since the curves that control the parameters can be drawn freely, this also means that it is possible to use REACT to bring other sounds to the forefront instead of lowering them.
A typical use for ducking AISAC is to simulate explosive sounds. Not only do these types of sounds require room to get louder, but they can also change our hearing for a short time, a phenomenon known as tinnitus. To simulate this effect, we can filter the high frequencies of the other playing sounds so that they become muffled, in addition to lowering their volume.
- To switch a Ducker REACT to control an AISAC, simply select the desired AISAC Control in the Change Parameter property.
- The Change Level Value now corresponds to the value of the AISAC control. We recommend that you set it to 0 to get the full range of the AISAC and use the AISAC graphs to adjust the maximum values for each parameter.
- For an explosion, you should set your Ambience category as the Changing Category, and your Weapon category as the Trigger Category.
- The other properties of the REACT can stay unchanged.
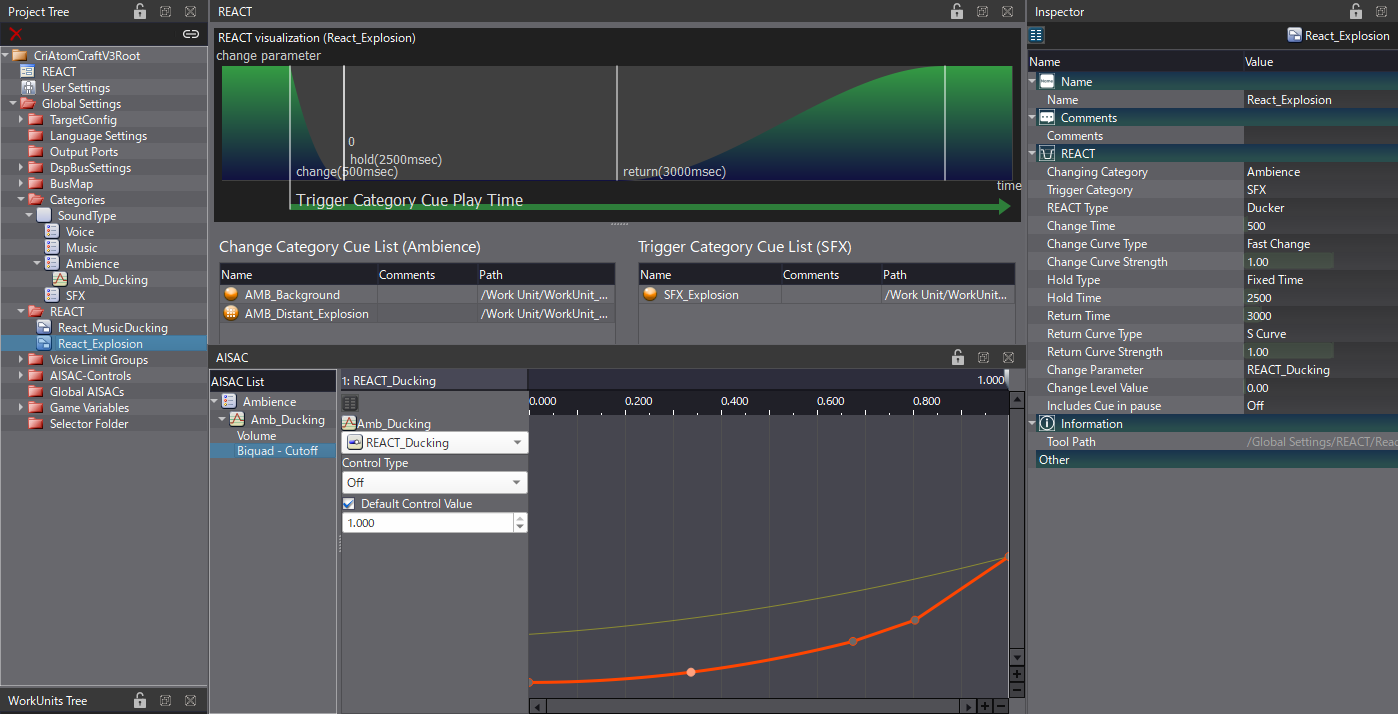
Here is how an explosion can affect the sound of an ambience with REACT:
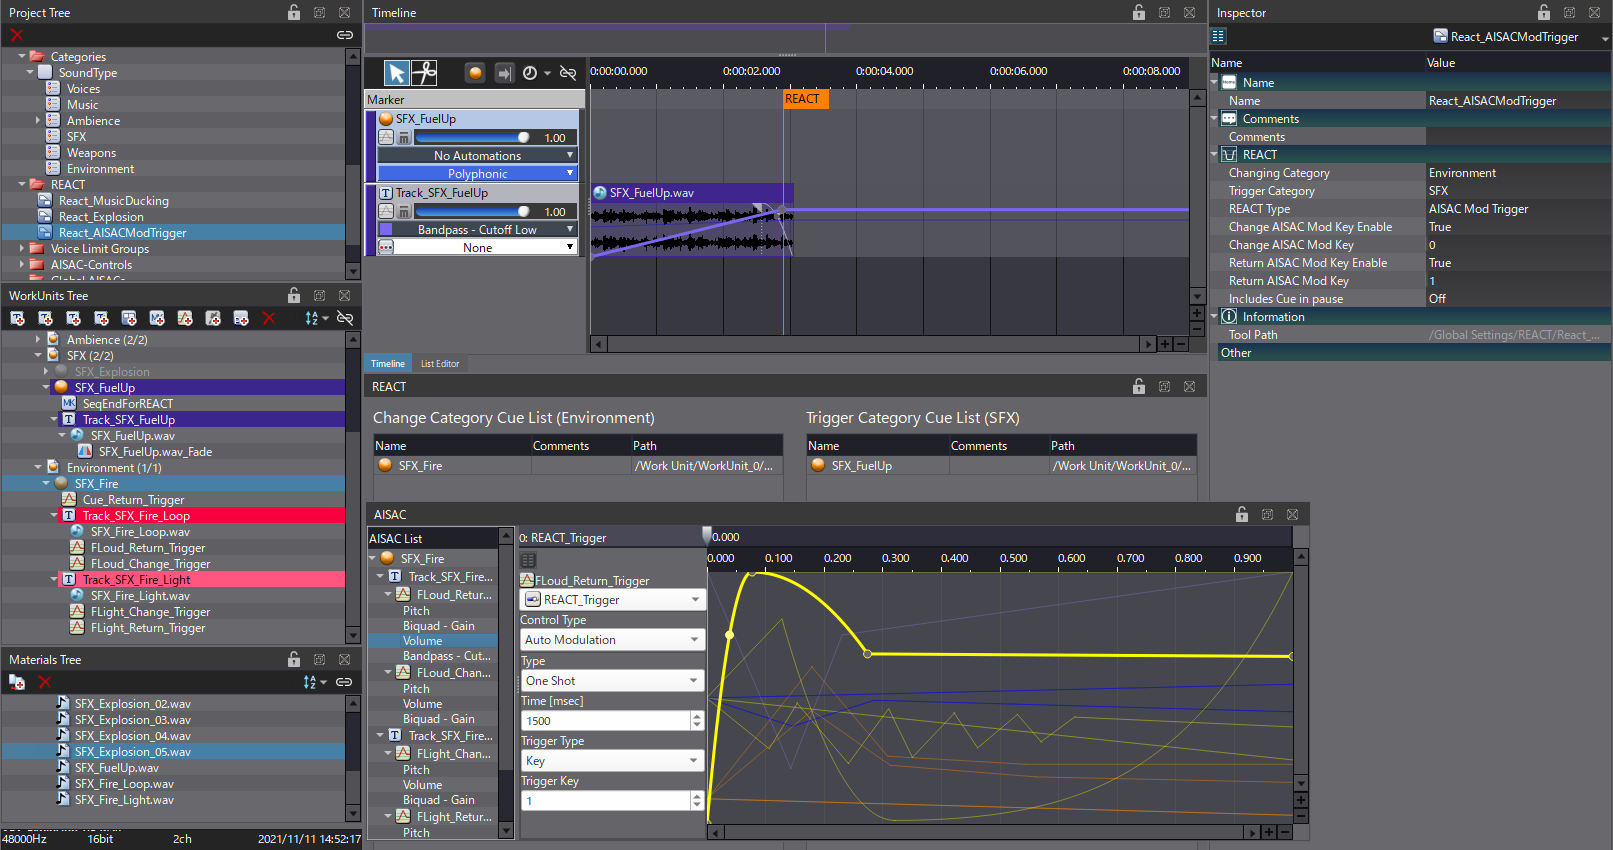
AISAC Modulation Trigger
The second mode of operation for REACT is called AISAC Mod Trigger, for AISAC Modulation Trigger. As the name implies, it is used to trigger an AISAC when its Control Type is set to Auto Modulation, One Shot (you can refer to our post about AISAC for more details).
In Ducker mode, since the properties are linked to an AISAC control, they will simply revert to their initial values when the REACT ends. However, in the AISAC Mod Trigger mode, different modulations can be applied at the start and end of the REACT. It is even possible to activate the modulation only at the start or at the end.
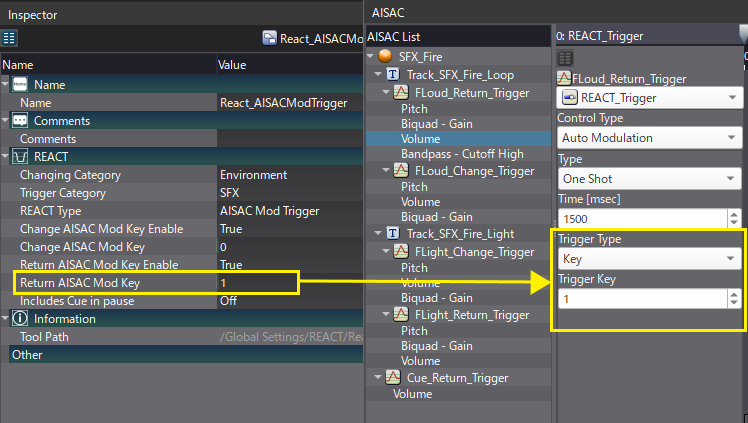
The AISAC Mod Trigger mode uses a Trigger Key to identify which Auto Modulation AISAC needs to be triggered by the REACT system. For instance, by setting the Return AISAC Mod Key to 1, any AISAC using the same Key will be triggered as soon as the REACT ends.
For instance, if we have a fireplace, we can muffle the sound while some fuel is being poured onto it, and then release a big burst of fire when all the fuel has been poured. Moreover, since there can be a different Auto Modulation AISAC on each track, various layers could come back with different timings, which is not possible in Ducker mode.
Here is how to set REACT to AISAC Mod Trigger:
- Create a new REACT object.
- Then change the REACT Type property to AISAC Mod Trigger.
- The settings available are different than in Ducker mode.
- The Changing and Trigger Categories are still required.
- However, instead of Change and Return Time, you must set the Keys in Change AISAC Mod Key and Return AISAC Mod Key.
- Change AISAC Mod Key: this is the AISAC modulation key value that triggers the change.
- Return AISAC Mod Key: this is the AISAC modulation key value that triggers the return to the original state.
This is all you need for the REACT part. Now you need to create some AISACs:
- If the Change and Return Keys are different, you will need to create two separate AISACs.
- Once the AISACs created, change their Control Type to Auto Modulation, One Shot.
- Set the Time for the modulation.
- Then, change the Trigger Type to Key, and set the Trigger Key that corresponds to the Change AISAC Mod Key and Return AISAC Mod Key in the REACT object.
- In the properties of the Cues linked to the REACT object, you can optionally add a Sequence End for REACT marker on the Timeline to accurately time when the return key is triggered.
Now when you trigger a Cue from the Trigger Category, all the Cues’ AISAC in the Changing Category that have the same Trigger Keys as the REACT will be activated.
Here is how it sounds in our fireplace example:
REACT provides a simple way to implement dynamic mixing by helping you determine which sounds to prioritize. It also opens the door to new, innovative effects. In the next post of this beginner’s guide, we will start diving into interactive music, for which ADX offers many interesting features.