

Robot API – Generate TTS from CSV
Recording dialog during a game’s production requires a significant investment in time and resources. Generating placeholder dialog using Text-To-Speech (TTS) technology helps game developers seamlessly integrate temporary voices into the game and allows progress and iteration on design and narrative elements, without having to wait for voice recordings.
But with thousands of lines of dialog required in modern game projects, it can be cumbersome to generate TTS for each line and implement them in your game or audio middleware. This is where scripts and automation can save hours of struggle.
In a previous post, we used both the CRI Robot API and the GameSynth Tool API to generate variations of procedural sounds directly in Atom Craft and to automatically create the right hierarchies and Cues. In this post, we will do something similar, starting from a CSV file and generating dialog lines with Text-To-Speech, from which Materials and Cues will be created.
Prerequisites
As you might expect, generating TTS is not something you can do natively with Python. So, for this script, we will introduce some new modules and extensions.
First, to make the script easier to use, we need a way to open a dialog box to select our CSV file. Fortunately, the Robot API provides a module that does exactly that: the View module. Note that this module also allows you to create custom message boxes and prompts, in case you need them.
Then, to read the CSV files, you will need to use the CSV module which comes natively with Python.
Finally, to generate the audio dialog, we need to install a third-party extension: Python for Win32 (pywin32) which provides access to many of the Windows APIs from Python, including the Microsoft Speech API (SAPI). This offers two advantages: first, SAPI comes with every version of Windows, making it easier to use. Second, the TTS generation is done locally, so you can be sure that your data is not uploaded to the cloud and exposed to potential leaks. An added benefit is that it is totally free!
To install pywin32, use pip in a command prompt:
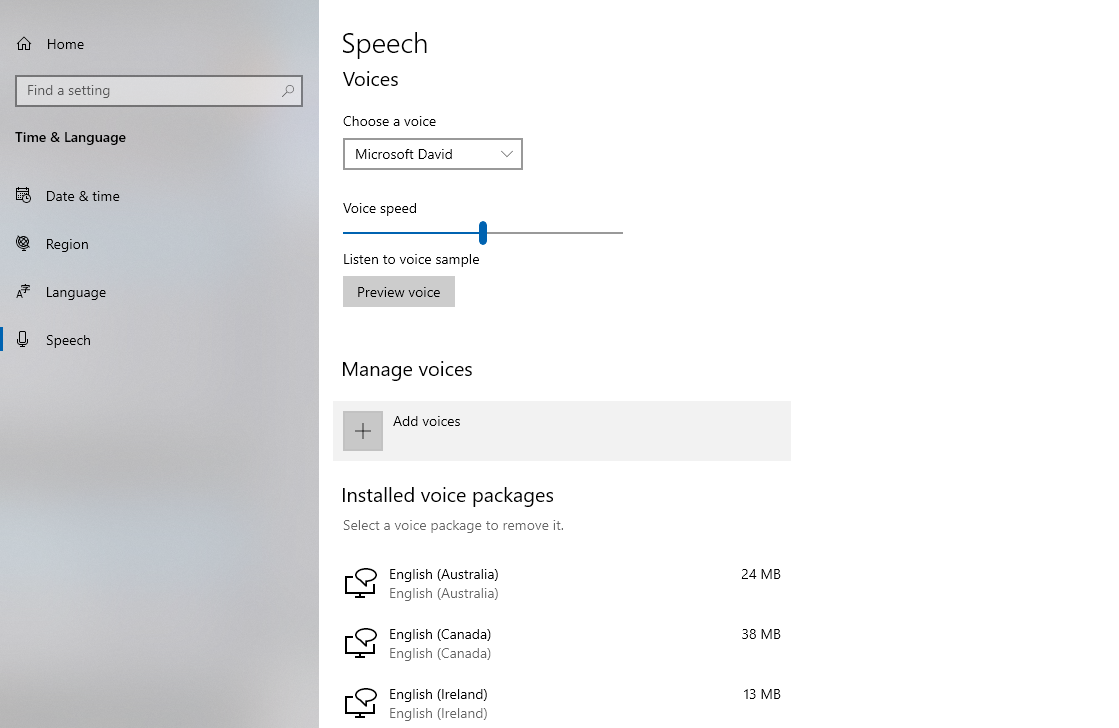
python -m pip install --upgrade pywin32In Windows, make sure that some voices are installed before using the script. In the Windows Settings, go to the Time & Language category. In the Speech tab, scroll down to Manage voices and click on Add voices. Our script uses the Microsoft David and Zira voices from the English (US) package, but you will be able to replace them with any other installed voices directly in the script.
Once pywin32 is installed, you can start editing your script header and import all necessary modules:
import sys
import os
import csv
import cri.atomcraft.debug as acdebug
import cri.atomcraft.project as acproject
import cri.atomcraft.view as acview
import win32com.client
Loading and Reading a CSV file
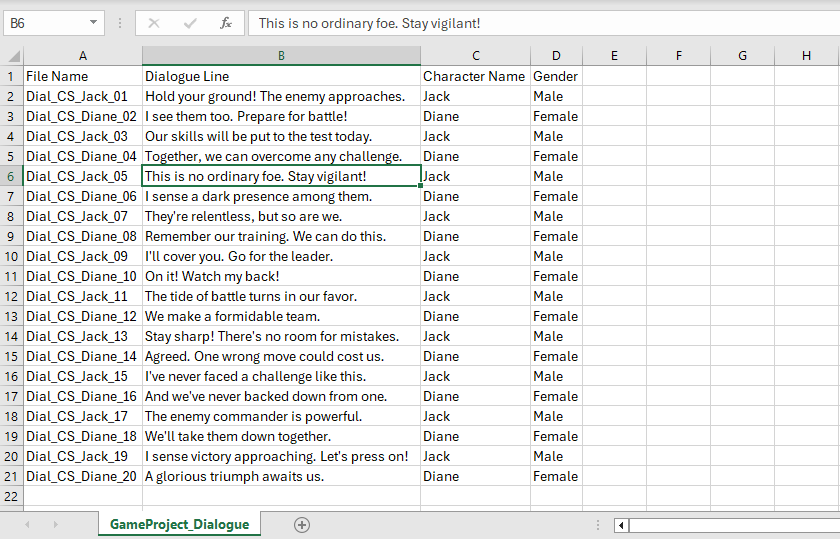
For our example, we will use a simple 20-row CSV with four columns containing the file’s name, the text of the dialog line, the character’s name, and the character’s gender.
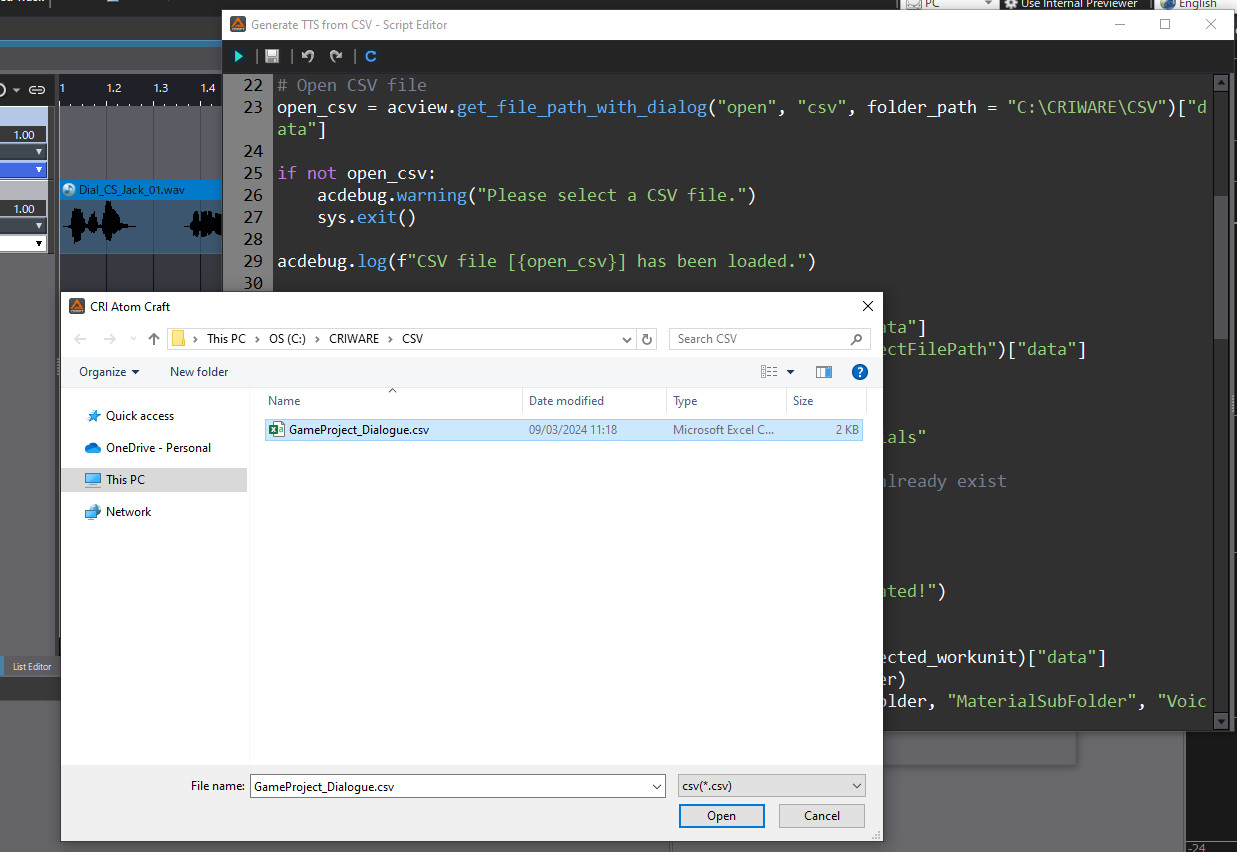
To be able to select and open a CSV file without hardcoding its path in the script, we will use the get_file_path_with_dialog function from the View module. This function takes three arguments:
- mode: the type of dialog box, which can be either “open” or “save”. In our case, we will use the “open” mode.
- suffix: the file extension of the files displayed in the dialog box, “csv” here.
- folder_path: the default folder to open in the dialog box.
Once the CSV file is selected in the Windows dialog and the Open button is pressed, the function will return the path of the file.
# Get the path of the CSV file
open_csv = acview.get_file_path_with_dialog("open", "csv", folder_path = "C:\CRIWARE\CSV")["data"]
Next, we can use the CSV module to read the CSV file.
- We use the with statement to process the CSV file from the path we got earlier.
- Then we read the file using the CSV module’s reader object.
- If your CSV has a header line, use the next function to skip over the first row.
- Finally, we use a for loop to iterate over each row in the CSV file and assign the values of the four columns to the corresponding variables: file_name, text, character_name, and gender.
# Read CSV file
with open(open_csv, newline="", encoding="utf-8") as csvfile:
    csv_reader = csv.reader(csvfile)
    next(csv_reader)  # Skip the header row

    for row in csv_reader:
        file_name = row[0]
        text = row[1]
        character_name = row[2]
        gender = row[3]
We will use these variables as follows:
- file_name will be used to name the generated TTS files, Materials, and Cues
- gender will determine which voice to use for the TTS generation.
- character_name and text will be concatenated and inserted as comments in the Materials and Cues.
Generating Text-To-Speech with Microsoft Speech API
Before we generate our audio files, we need to find the path to the Materials folder of our Work Unit. We use a similar but simpler approach than in this previous post, so be sure to read it for a deeper understanding. The main difference is that we must select a Cue Sheet for the script to work, and the name of the Material folder created is “Voices”, with its path saved in the voices_folder_path variable.
Now that the path where to render our audio files is known, we can start generating them:
- We first initialize the SAPI SpVoice object used for the text-to-speech synthesis.
- We create an instance of the SAPI SpObjectTokenCategory object to categorize and manage different voices.
- Then, we enumerate the available voices listed in the Microsoft Speech OneCore Voices registry key.
- If the gender variable is Male, we look for the Microsoft David voice. If it’s Female we look for the Microsoft Zira voice. This is where you can change the voices you want to use (as long as they are installed).
- The selected voice is then assigned to the Speaker object.
- After setting the output file name and the path, we create an audio stream with the SAPI SpFileStream object. It is then associated with the speaker object to synthesize audio from the text in the CSV.
- Finally, the stream is closed to finalize the writing of the WAV file.
# Initialize the SAPI SpVoice object
speaker = win32com.client.Dispatch("SAPI.SpVoice")

# Select a TTS voice based on gender
voicecat = win32com.client.Dispatch("SAPI.SpObjectTokenCategory")
voicecat.SetID(r"HKEY_LOCAL_MACHINE\SOFTWARE\Microsoft\Speech_OneCore\Voices", False)

# Map gender to voice names
gender_to_voice = {
    "Male": "Microsoft David",
    "Female": "Microsoft Zira",
}

# Check if the desired voice is in the list of voices
if gender in gender_to_voice:
    voice_name = gender_to_voice[gender]
    voicetts = [t for t in voicecat.EnumerateTokens() if t.GetAttribute("Name") == voice_name]
    if voicetts:
        speaker.Voice = voicetts[0]

# Set the output file name and path
wavefile_name = file_name + ".wav"
output_file_path = os.path.join(voices_folder_path, wavefile_name)

# Create a SpFileStream object to save the speech as a WAV file
stream = win32com.client.Dispatch("SAPI.SpFileStream")
stream.Open(output_file_path, 3, False)

# Render the TTS voice
speaker.AudioOutputStream = stream
speaker.Speak(text)

# Close the stream to save the changes
stream.Close()
Creating the Materials and Cues
The WAV files were rendered in the Materials folder. We first need to register them using acproject.register_unregistered_materials().
Then, the process of getting the Materials and creating the Cues will be similar to what we did in this previous post.
- After getting a Material, we first add a comment on its properties. The comment string is a concatenation of the character_name and text variables.
- Then, we use the create_simple_cue function which uses the defined Material to create and name a Cue, along with its Track and Waveform Region. This avoids having to create all these objects manually, as we did last time.
cue = acproject.create_simple_cue(selected_cuesheets[0], material)["data"]
- Finally, the same comment string is added to the Cue:
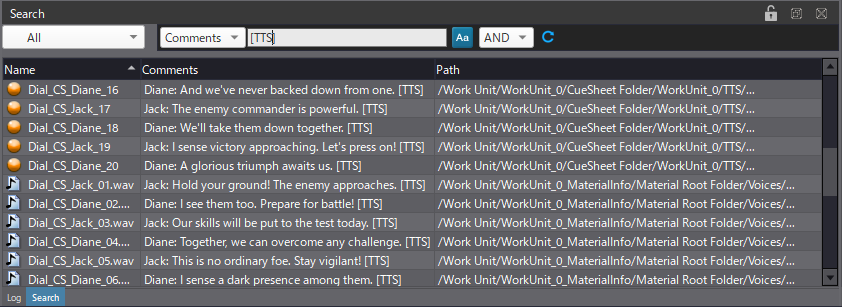
comment_text = (character_name + ": " + text + " [TTS]")
The [TTS] suffix is simply a convenient way to quickly check for placeholder dialog when you start importing the final voices into Atom Craft. You just need to search for [TTS] in the Search view.
You now have a quick way to generate all the dialog Cues for your game in a few clicks. You can edit the script to adapt it to your game’s dialog pipeline. For instance, your CSVs may be organized differently, or your main language may not be English, in which case you will probably want to select other voices.
You can download the Python script and the CSV we used for our example below.
 Script_RobotAPI_GenerateTTS.zip