

ADX Beginner’s Guide #5 – DSP Bus Mixer
In the previous posts, we learned about the many features of the Cue, making them the center of any interactive audio implementation with ADX. In this post and the next, we will focus on how the sounds generated by these Cues are mixed and sent to the speakers, thanks to ADX’s DSP Bus system.
Mixing in Atom Craft
Mixing a game involves balancing various elements such as ambient sounds, dialog, and music to create a cohesive and immersive audio experience for the player. The goal is to enhance the gameplay by ensuring clear audio feedback, preserving the atmosphere, and providing an engaging auditory experience that complements the visual elements of the game.
As audio levels can be adjusted at various stages in AtomCraft, it is important to first understand the mixer architecture and audio signal path. This diagram shows how the audio signal flows from the Material waveform to the Master output:
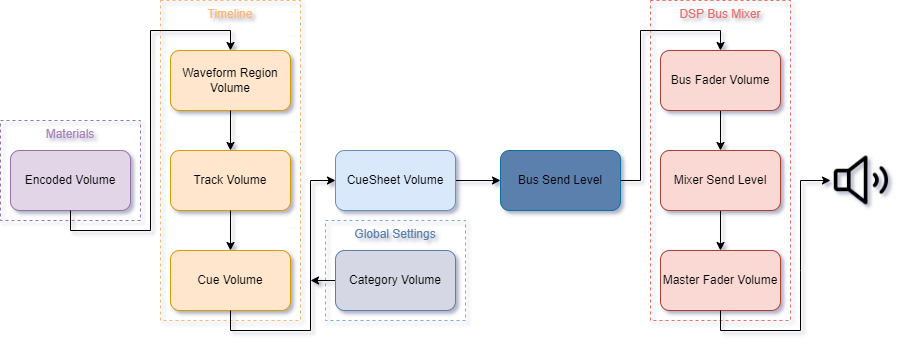
Since all level settings are essentially scalers, changing the volume of a particular element will affect the volume of the preceding ones in the signal flow.
For instance, changing the volume of a Cue will affect the volumes of all its Tracks and all the Waveform Regions contained in this Cue. Changing the Bus Fader Volume will affect the volumes of all the Cues routed to that Bus (which in turn will change the volumes of all the Tracks, Regions, and Materials used in all these Cues).
DSP Bus Mixer
A DSP Bus is an object that mixes the sounds being played back. The sound data resulting from the triggering of Cues are routed to one or several busses which will then be summed in the MasterOut bus to generate the final audio output.
Typically, you will want to regroup Cues of the same type under the same DSP Bus – e.g. ambience Cues routed to the ambience bus, dialog Cues routed to the dialog bus, etc. This gives you global control over the volume of all the types of sounds that are part of your mix. The DSP Bus can also be used to manage effects such as reverberation. This is the equivalent of using submix busses and auxiliary busses on a traditional audio mixer.
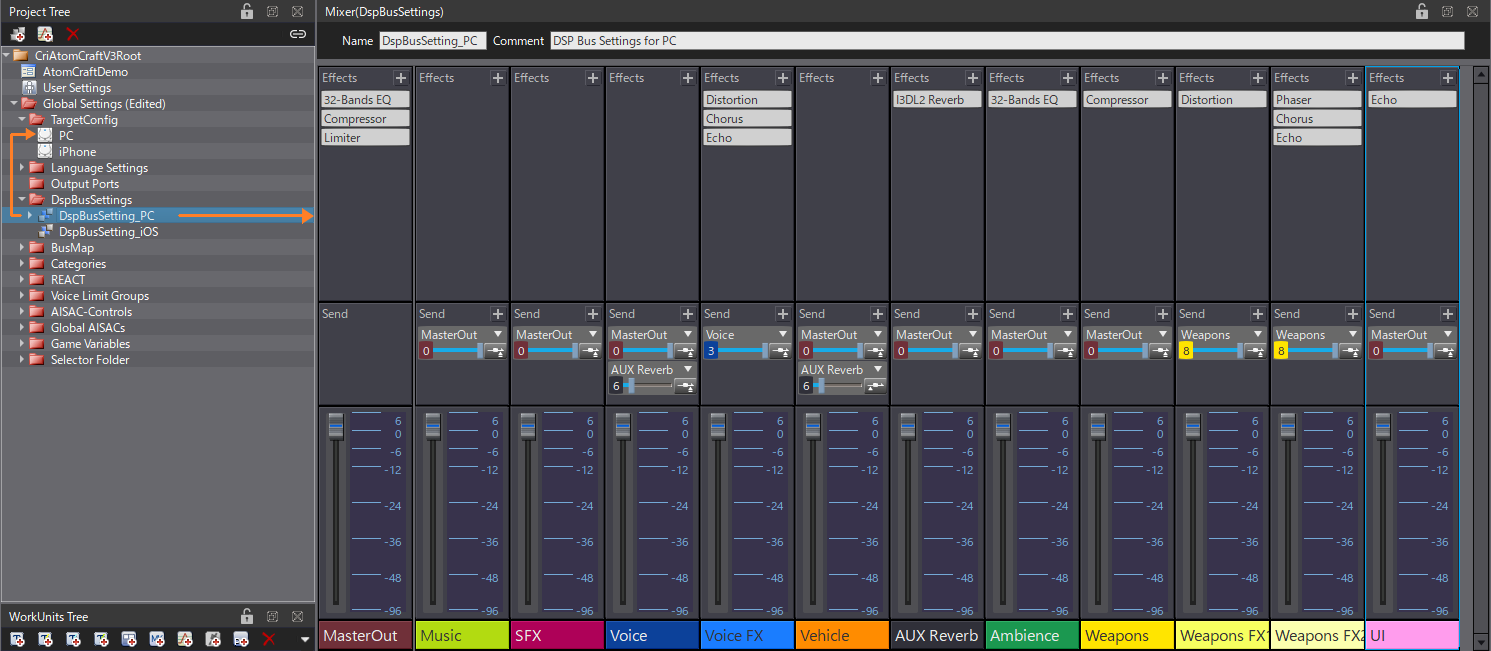
Mixer configurations are called DSP Bus Settings and can be found in the Global Settings folder. The Mixer view displays the bus architecture and allows you to configure it. New busses can be added, they can be routed to other busses and/or the MasterOut, and audio effects can be assigned.
It is possible to create multiple DSP Bus Settings for platform-specific mixer configurations. For example, if your game is targeting both PC and Smartphones, you may want to reduce the number of effects and slightly simplify your configuration to meet the specifications on smartphones.
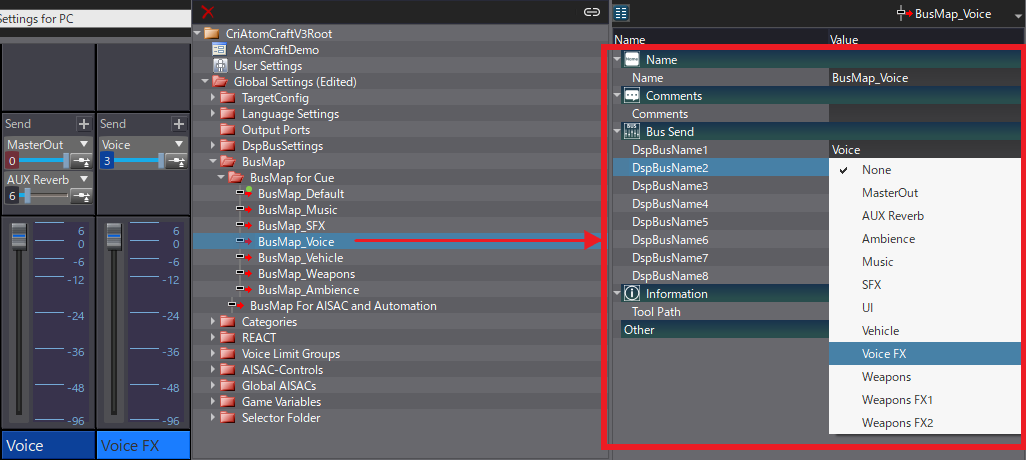
Once the DSP Bus Settings are set, Cues can be routed to the desired busses. A Bus Map needs to be created first, allowing to route the output of a Cue to a bus.
- In the Global Settings, go to BusMap, and select the Bus Map for Cue folder.
- Right-Click, Create New Objects, then Create Bus Map.
- Select the new Bus Map and, in the inspector, set the Busses you want to assign. For instance, if you want to use this Bus Map for your dialog Cues, you should assign all DSP Busses that are used for your dialog – i.e. related submix and auxiliary effects.
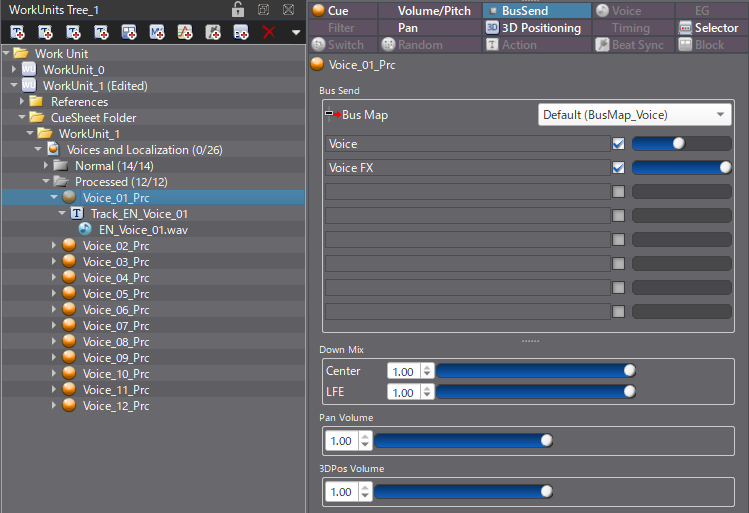
After the Bus Maps are created, they can be assigned to the Cues. To do this:
- Select a Cue.
- In the Inspector, go to the Bus Send section.
- Choose the desired Bus Map.
- The list of available busses will be updated, and you will be able to activate the busses and set the Bus Send level (the amount of audio sent to the DSP Bus).
- Note that the activation of a bus and the Send level for a Track and a Waveform Region can be overridden (for example, you could decide to send only one Track of the Cue to the effect bus).
Now that we have a grasp of the fundamentals of mixing in Atom Craft, we are ready to dive into DSP effects and mixing Snapshot in the next post!