

AISAC Crossfades Script with Robot API
Automating tedious and time-consuming tasks is one of the many benefits of using the CRI Atom Craft Robot API. For instance, there are many cases where you will need to use an AISAC to crossfade between the tracks of a Cue. This could be an engine sound where you need to blend different RPM loops, a rain sound with several levels of intensity, or a music sequence where new layers are added progressively.
If your Cue contains more than two or three tracks, it could take a lot of time to set the AISAC graphs properly for each track. In this post, we will see how to leverage the Robot API and write a Python script that automatically creates AISAC graphs crossfading between tracks.
Object User Variable
When creating an AISAC for an object (Cue, Track, etc.), an AISAC-Control must be specified. As we saw previously, the Robot API allows User Variables to be added within a script, so users can change the object/string/value specification in the GUI rather than directly in the code.
A User Variable is defined as follows:
# --BeginUserVariable
"""
AISAC_CONTROL:
  type:object
  comment:AISAC-Control to use for the crossfades.
"""
AISAC_CONTROL = None
# --EndUserVariable
We need to use a User Variable of the Object type, which is a bit different from the Value or String types. When defining an Object variable, a drag-and-drop area will appear in the script’s GUI. Drag and drop an AISAC-Control object from the Project Tree. After clicking the Apply button, the code will be updated to get the specified object.

Script Logic
We can now create the AISAC and the graph for each selected track, which will have a bell shape, so sounds can smoothly fade in and out.
We start by getting the list of selected tracks with the get_selected_objects function and determine the number of tracks.
# Get selected tracks:
selected_tracks = acproject.get_selected_objects("Track")["data"]

# Get number of tracks
track_number = len(selected_tracks)
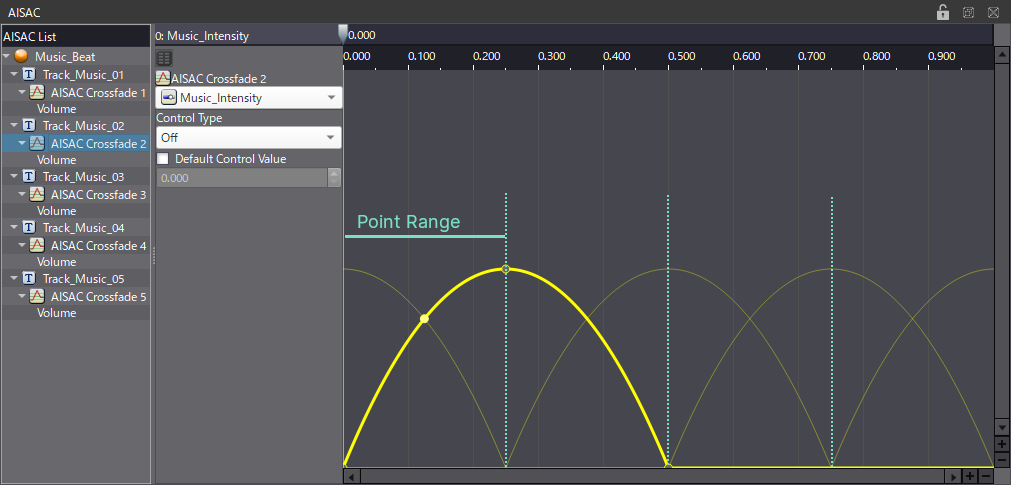
The center points of the bell shapes will be equidistant from each other on the X-axis. So, we first calculate the distance between two successive center points. Since the x-axis of an AISAC is between 0 and 1 we simply need to divide 1 by the number of tracks minus 1.
# Get distance between points
point_rng = 1 / (track_number - 1)
Now that we have the distance between each center point, we write a loop that goes through every track to create the AISAC and its graph. To achieve this, we use the create_aisac and create_aisac_graph functions. Of course, since we are creating crossfades, the AISAC graph will have to be of type Volume:
for i in range(track_number):
  # Create AISAC under the current track:
  track_aisac = acproject.create_aisac(selected_tracks[i], aisac_graph_name, AISAC_CONTROL)["data"]

  # Create Volume graph:
  volume_graph = acproject.create_aisac_graph(track_aisac, "Volume")["data"]
Except for the first and last track, graphs should have 3 points, with the following value on the y-axis (called Destination Value for an AISAC).
- 0 for the start point.
- 1 for the center point.
- 0 for the end point.
The graphs for the first and last tracks should have a fade-out and a fade-in shape, respectively. This means they will only need two points, which are:
- Center and end points for the first track.
- Start and center points for the last track.
Consequently, we will add conditions to avoid creating unwanted points for the first and last tracks.
For the graphs to crossfade, we will also increment the position of the point on the x-axis (called Control Value for an AISAC) at each iteration.
Graph points are created with the create_aisac_point function:
# Create graph points based on the position in the track list
# Create a start point, except for the first track
if i > 0:
  control_value_start = (point_rng * (i - 1))
  destination_value_start = 0
  graph_point_start = acproject.create_aisac_point(volume_graph, control_value_start, destination_value_start)["data"]

# Create a center point
control_value_center = (point_rng * i)
destination_value_center = 1
graph_point_center = acproject.create_aisac_point(volume_graph, control_value_center, destination_value_center)["data"]

# Create an end point, except for the last track
if i < track_number - 1:
  control_value_end = (point_rng * (i + 1))
  destination_value_end = 0
  graph_point_end = acproject.create_aisac_point(volume_graph, control_value_end, destination_value_end)["data"]
For the moment, with only 3 points, the graphs have triangular shapes. However, we can change the CurveType of the points to create the expected bell-shaped graphs needed for crossfading. Only the center and end points need to be updated by using the set_value function.
# Change curve type of the center point, except for the first track
curvetype_center = "FastChange"
acproject.set_value(graph_point_center, "CurveType", curvetype_center)

# Change curve type of the end point
curvetype_end = "SlowChange"
acproject.set_value(graph_point_end, "CurveType", curvetype_end)
You can download the full script below. Open it in AtomCraft’s script editor, then drag and drop an AISAC-Control on the User Variable area. Click the apply button and save the script. Finally, select the tracks and run the script to automatically create crossfades!
 AISAC – Create Tracks Crossfades.py