
Creature Vocalizations
Games in many genres from fantasy to sci-fi and horror feature fantastical creatures. From the ferocious roar of a dragon to the haunting wail of a ghost, creature vocalizations play a crucial role in bringing these otherworldly beings to life in your game. In this post, we will implement an interactive monster growl in Atom Craft, with a technique you will be able to re-use for other creature vocalizations.
Asset Creation
As usual, in order to create enough variations during playback and add a bit of control via an AISAC, we need to create several layers for the sound. There are a lot of possible audio sources when designing a creature. Of course, recording animals in the wild is the best way to get the most realistic sound, but using your own voice, recording friction sounds on different objects, or generating sound via synthesis can produce unexpected yet convincing results. There is plenty of room for experimentation!
For this implementation, we decided to create four layers:
- A light growl, for the idle behaviour.
- A more aggressive growl when the creature is attacking.
- A low rumble sound to add emphasis in the low frequencies.
- And finally, a breathy component that makes the overall sound more organic.
For each layer we designed several variations that will then be imported in Atom Craft.
Implementation
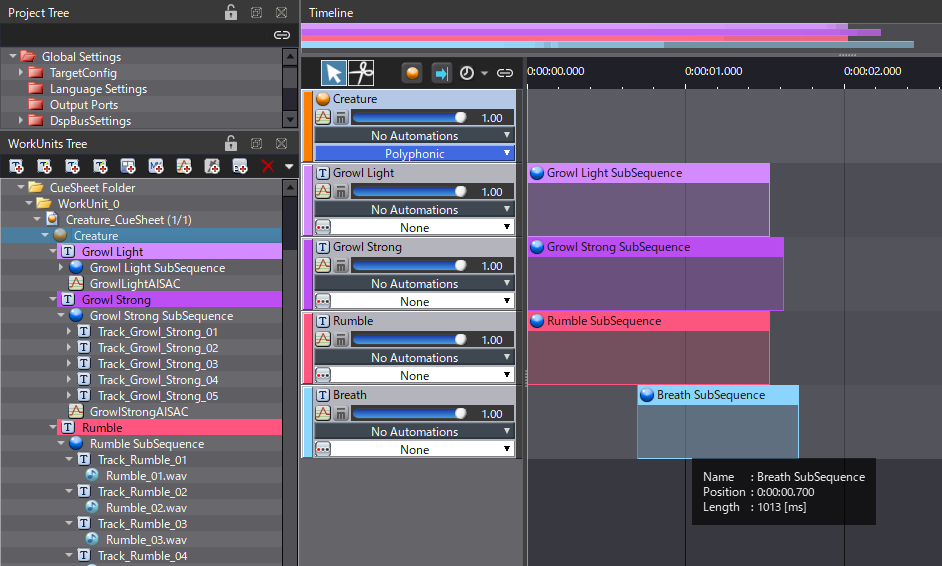
As the aim is to produce variations, a Cue with several tracks containing Sub Sequences is used:
- First, create a Polyphonic Cue with four tracks.
- On each track, add a Sub Sequence of type Shuffle.
- Then, drag and drop the sounds for each of the four layers into a specific Sub Sequence.
- Shift the Sub Sequence containing the breathy layer a bit, so that it finishes playing a bit after the other ones.
This Cue should already produce some interesting sounds, but now is the time to add a bit of randomization to some of the parameters:
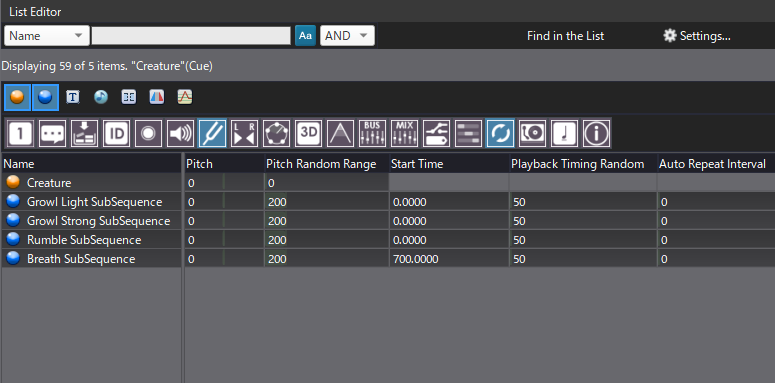
- Open the List Editor window and select your Cue in the WorkUnits Tree.
- Filter the displayed items to only show the Sub Sequences.
- Show the Pitch and Timing Control parameters.
- Select all the Sub Sequences and change the Pitch Random Range to 200 cents.
- Then, change the Playback Timing Random property to something between 50 and 100 ms, depending on your assets.
Simply randomizing the pitch and timing will add a lot more variation.
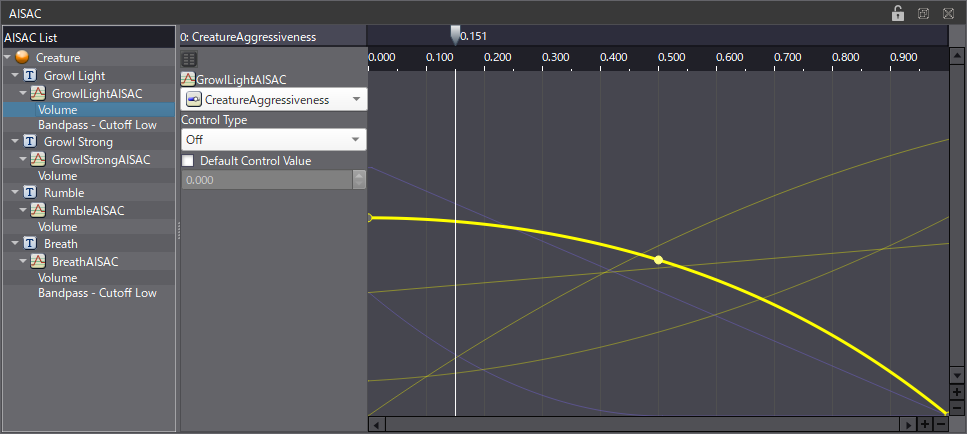
AISAC and Effect
The AISAC will allow us to make the sound more dynamic, and to control the aggressiveness of the creature.
- In the Project Tree, create the CreatureAggressiveness AISAC.
- Then, bind the Volume graph of each track of the Cue to the AISAC.
- Add a fade-out curve to the light growl layer, while the three other ones will have a fade-in. When the AISAC is at 0 you can keep a bit of the breath and rumble layers though.
- Finally, on both the light growl and the breath, add a Bandpass – Cutoff Low graph with a fade-out curve.
You can now change the aggressiveness of the creature with just one AISAC that can be linked to its in-game behaviour!
As a final touch, we can add a bit of modulation to the creature’s sound to make it more organic.
- In the Mixer window, create a new Bus.
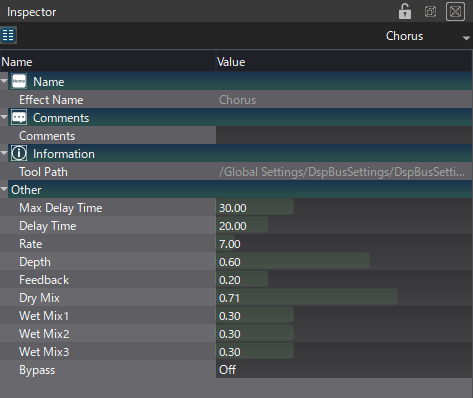
- Add a Chorus effect and change the Rate to 7.00, the Depth to 0.60 and the feedback to 0.20. However, the three Wet Mix settings should be lowered to around 0.3.
- Then, route the Cue to the bus to hear the effect.
With the different layers, the randomization, the AISAC, and the effect we could quickly implement a convincing and dynamic creature sound. Download the demo project and start making your own monster vocalizations!
 AtomCraft_Project_CreatureVocalization.zip