
Controlling Gamepad Vibration with Sound in Unity using ADX2
Introduction
Being able to control gameplay with audio information is a great way to take out some of the manual work needed to create a complex game system. Fortunately, ADX2 is loaded with easy to use features for achieving bi-directional control between game engine and audio engine. This blog will look at using ADX2’s analysis capabilities to directly control the level of shake in an Xbox 360 controller.

This project was created using CRIWARE SDK for Unity V2.99.00 and Unity V2019.2.10f1
Atom Craft
For our system to work, we need some sort of sound (such as music), and a bus where we can send data to be analysed later.
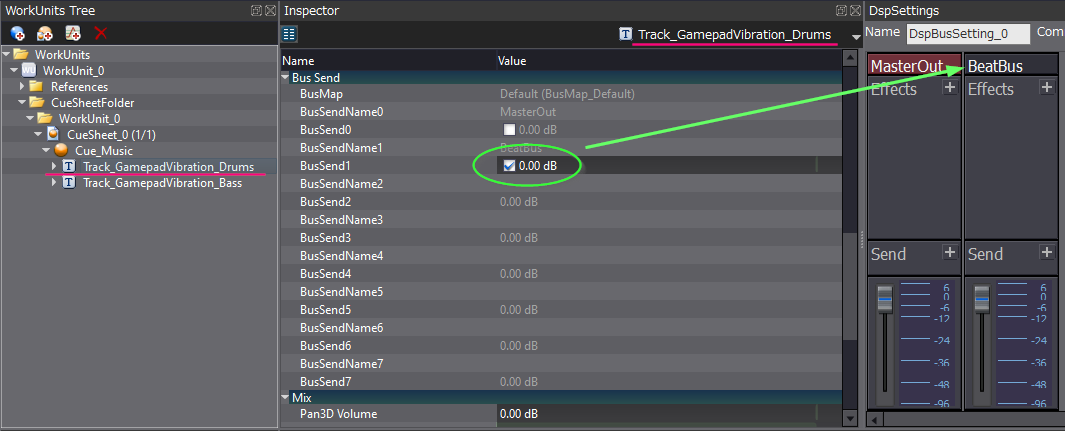
Starting with the bus:
- In the Project Tree – navigate to DspBusSetting_0
- Create a new bus, and name it “BeatBus”
- In the Project Tree – navigate to BusMap_Default
- Set DspBusName1 to BeatBus
Don’t worry about sending any signal from the BeatBus to MasterOut, this bus is only for analysis. Also, make a note of the newly created bus’s name, as it will be referenced to in Unity.
Then, for the all-important audio data:
- Create a new Polyphonic Cue, and name it “Cue_Music”
- Add Bass and Drum Waveform Materials to separate Tracks in Cue_Music
- In the Inspector – enable BusSend1 for Drum Track
This should give us everything we need to test with, so we can now Build the CueSheet Binary (With Unity Assets set to enabled in the Additional Outputs settings) and load up Unity.
Unity
To make controller input easier to manage, we can download a Unity plugin called XInputDotNet. This will give us some handy boilerplate to make controller setup very simple. This single script below will handle all our controller management and audio analysis.
using System.Collections;
using System.Collections.Generic;
using UnityEngine;
using XInputDotNetPure;

public class GamepadShaker : MonoBehaviour
{
    bool playerIndexSet = false;
    PlayerIndex playerIndex;
    GamePadState state;
    GamePadState prevState;

    void Start()
    {
        CriAtom.AttachDspBusSetting("DspBusSetting_0");
        CriAtom.SetBusAnalyzer(true);
    }

    void Update()
    {
        // XInput boilerplate to find and assign connected controller
        if (!playerIndexSet || !prevState.IsConnected) {
            for (int i = 0; i < 4; ++i)
            {
                PlayerIndex testPlayerIndex = (PlayerIndex)i;
                GamePadState testState = GamePad.GetState(testPlayerIndex);
                if (testState.IsConnected)
                {
                    Debug.Log(string.Format("GamePad found {0}", testPlayerIndex));
                    playerIndex = testPlayerIndex;
                    playerIndexSet = true;
                }
            }
        }

        // Analyze the amplitude of the bus, and vibrate controller accordingly
        CriAtomExAsr.BusAnalyzerInfo busInfo = CriAtom.GetBusAnalyzerInfo("BeatBus");
        float vibrationIntensity = busInfo.peakLevels[0];
        GamePad.SetVibration(playerIndex, vibrationIntensity, vibrationIntensity);
    }

    private void OnDestroy()
    {
        CriAtom.DetachDspBusSetting();
        GamePad.SetVibration(playerIndex, 0, 0);
    }
}
Most of the above is copy-pasted boilerplate from the XInputDotNet plugin and simply deals with ensuring that the controller is connected and correctly assigned. The integral parts relating to what we are trying to achieve have been highlighted.
First off, in the Start function, we Attach our DSP bus and enable the analyser feature for our analyser to work. Next, in the Update function:
- We create a variable called “busInfo” and tell it to get the analyser information from the bus that we created in Atom Craft (BeatBus).
- Then we create another variable called “vibrationIntensity”, which gets the peak amplitude in real-time from our bus (the square brackets specify 0 - i.e. the left channel)
- Finally, the SetVibration function sets the current controller’s (playerIndex) vibration for the left and right motors of the controller to our vibrationIntensity.
We should also make use of an OnDestroy function to do some clean-up, which will stop the controller from vibrating if the application is terminated.
Since the kick drum used in the example above is monophonic, it’s fine to use either left or right channel. However, using the above method, we could easily control the left motor with left channel data and right mother with right channel data.
Conclusion
It may not be the most efficient method of adjusting controller vibration, but it’s a fun way of getting some very direct control between the data generated by our sound and our game engine. It can also be handy for prototyping ideas before a more robust method is implemented.