

Getting started with the Robot API
The Robot API of Atom Craft makes it possible to automate workflows in the authoring tool by writing Python scripts.
It can be used for instance for the registration of large amounts of assets in a project, for the batch-editing of properties, or to build integrations with other tools, such as DAWs.
By reducing the number of repetitive tasks to perform and by minimizing potential mistakes, it will undoubtedly increase the efficiency of your sound team!
The Robot API comes installed with Atom Craft. It already includes many useful scripts, that can also be used as references for your own efforts.
Configuration
1. Installing Python
To use the Robot API, Python must to be installed. At the time of this writing, Atom Craft ver. 3.48.02 supports Python version 3.7, 3.8 or 3.9. If you are using a more recent version of AtomCraft, please check the latest compatibility list in the documentation.
- Download a version of Python compatible with AtomCraft from https://www.python.org/
- During the installation, check “Add Python to environment variables” in the advanced options.
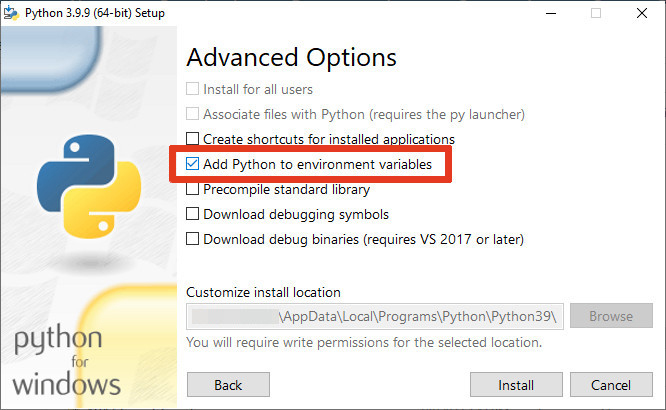
If you forgot, you will still be able to do it manually later by assigning your installation path to the PYTHONHOME and PATH environment variables.
2. Configuring Atom Craft
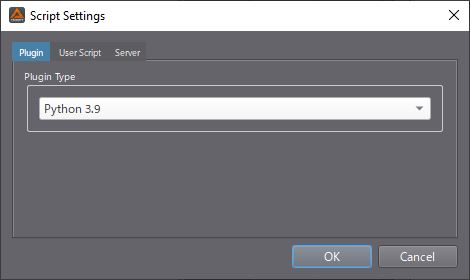
- In AtomCraft, select the Script > Script Settings > Plugin menu command.
- For the Plugin Type, choose the version of Python you just installed.
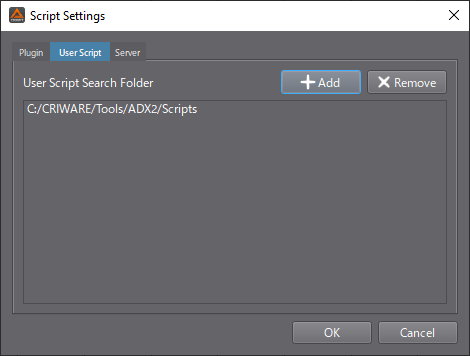
- Finally, you can specify the folders in which Atom Craft will look for script files. To add new folders, go to the User Script tab, and click on the Add button. The scripts located in these folders will be accessible via the Script List and Script Menu.
Hello, World
Before starting, keep in mind that the Robot API directly manipulates the data structure of the project in Atom Craft. The overall data structure is fixed and divided into 3 trees – “Project”, “Work Unit”, and “Material”.
Atom Craft comes with an IDE to write your own scripts. You can also use any external editor if needed, but if you are just getting into scripting, it is probably the easiest way to start.
To create our first script:
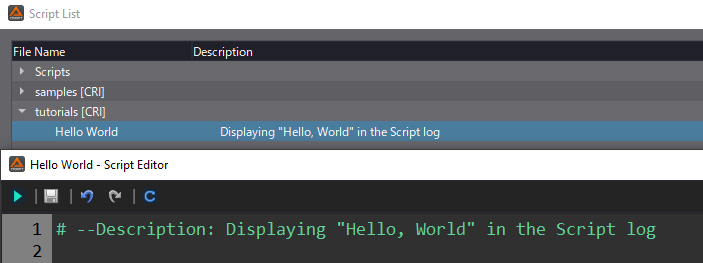
- Go to the Script menu and select Script List to open the list of scripts.
- Then, under tutorials or in your own folder (if you previously added one), click on the New button, name the script “Hello World” and click on Save.
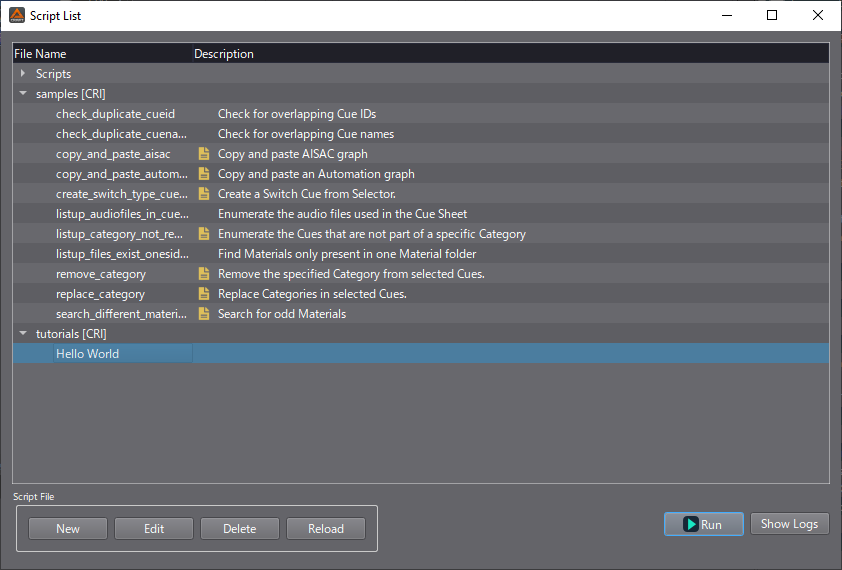
- Select your newly created script and click on the Edit button to open the Script Editor.
We will first write a script to display “Hello, World” in the Atom Craft log.
- Start by writing a comment to describe our script.
- The Script list will detect a comment written in a specific format and display it in the list’s “Description” field.
# --Description: Displaying "Hello, World" in the Script log
- Once your comment is input, click the Save button. The description in the Script List will be automatically updated.
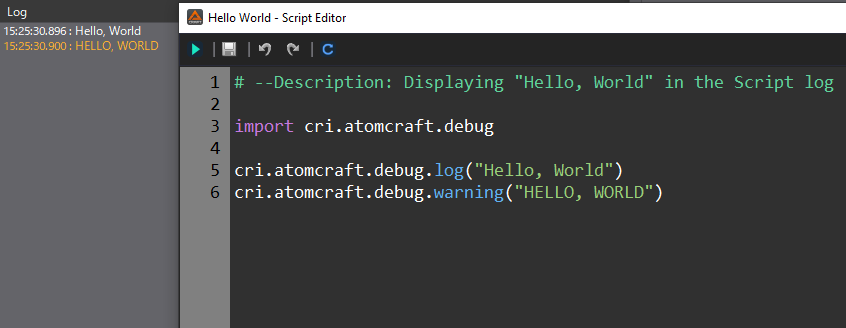
The Robot API comes with external Python modules for manipulating Atom Craft data. For example, here we will need the Debug Module. To use an external Python module, write import and the name of the module:
import cri.atomcraft.debug
- The Debug module provides several string output functions. We will use the log function to display “Hello, World”:
cri.atomcraft.debug.log("Hello, World")
- Note that you can also use the warning function to display a highlighted string in the Atom Craft log tab:
cri.atomcraft.debug.warning("Hello, World")
- Save, Run the script, and check its output in the log.
Creating a Cue
Finally, we will write a simple script that adds a new Cue to the selected CueSheet. After creating a new script in the Script List window and writing a description, let’s import the modules we will need.
- In addition to the Python’s standard modules “sys” and “os”, we will import the Debug Module that we already have used, and the Project Module to be able to work with the project data of Atom Craft.
import sys
import os
import cri.atomcraft.debug as acdebug
import cri.atomcraft.project as acproject
By adding “as” and a name after an imported module, this name can be used as an alias to reference the module (here “acdebug” and “acproject” for cri.atomcraft.debug and cri.atomcraft.project, respectively), making the script more readable.
Now we must get the selected Cue Sheet. The get_selected_objects function will return all the selected objects of a given type in an array. So, we passed the string “CueSheet” to only get the CueSheets.
selected_cuesheets = acproject.get_selected_objects("CueSheet")["data"]
- Then we simply use the create_object function to create an object of a given type under a given name. The parent object in the project is also passed as an argument. Here, we select the first selected Cue Sheet that was returned, i.e. selected_cuesheets[0]).
cue_name = "My_Cue"
acproject.create_object(selected_cuesheets[0], "Cue", cue_name)["data"]
After saving your script, you can now select a Cue Sheet in the WorkUnits Tree and Run the script to create a new cue called “My_Cue”.

This script could be improved, for example by first making sure that a Cue Sheet was actually selected before creating the new cue, and adding some feedback in the log. The final code could look like this:
# --Description: Create a new Cue in the Selected CueSheet
import sys
import os
import cri.atomcraft.debug as acdebug
import cri.atomcraft.project as acproject

# Get the selected CueSheets
selected_cuesheets = acproject.get_selected_objects("CueSheet")["data"]


# Check if a CueSheet is selected
if not selected_cuesheets:
   acdebug.warning("Please select a CueSheet.")
   sys.exit()

else:
# Get the name of the first selected CueSheet
   cuesheet_name = acproject.get_value(selected_cuesheets[0], "Name")["data"]

# Create a Cue in the selected CueSheet
   cue_name = "My_Cue"
   acproject.create_object(selected_cuesheets[0], "Cue", cue_name)["data"]

   acdebug.log(f"The Cue \"{cue_name}\" was created in the CueSheet \"{cuesheet_name}\"")
This concludes this introduction to the Robot API. With a bit of experimentation, you should be able to create new workflows and automations that will make using Atom Craft even more efficient. Stay tuned for future posts about the Robot API functions!
 AtomCraft_Robot_PythonScript_CreateCue.zip